Twitter Pinterest Instagram Facebook

12.19.2015

Chinese Pork and Shrimp Wontons

My mom and my late grandmother both love wontons. As a child, we had wontons on a regular basis at home during the winter months. As a kid, I can't say I really loved wontons since I usually burnt my tongue trying to eat the little suckers; I am impatient when it comes to food.

I remember watching my mom and my late grandmother spend half a day making a big batch of wontons, most of which were frozen for future meals or for busy nights when dinners needed to be on the table quickly.

I never realized how easy it is to make wontons if you used packaged wrappers. Be forewarned though, making wontons does takes a little effort and time. The batch I made turned out 54 wontons and took me about an hour and half to make from start to finish. I made enough wontons for two meals that fed my family of three. You can also stretch the wontons by adding egg noodles to each serving, which reduces the amount of wontons you have to serve.

I have to say these wontons are absolutely delicious. The shrimp adds a nice texture to the wontons and my husband declared it the best wontons he has ever had. I'm delighted by his comment since my Mother-In-Law makes pretty darned good wontons. Since I spent my life eating wontons, I consider myself a wonton connoisseur, this wontons even met my high expectations. This is definitely a recipe I would remake over and over. I think these wontons would have made my late grandmother proud.


Ingredients
1 lb lean ground pork
1/2 lb finely minced deveined unshelled shrimp
3 green onions, finely chopped
1 inch ginger, peeled and finely grated
2 tbsp light soy sauce
1 egg
1-1/2 tsp sesame oil

1 package of wonton wrappers (look for wonton wrappers that are a little thicker)

Bowl of water
Cutting board
Baking sheet lined with parchment paper

Directions
1. In a large bowl, mix the pork, shrimp, green onions, ginger, soy sauce, egg and sesame oil. Stir until it is thoroughly mixed and the mixture resembles a paste.


2. Line a baking sheet with wax or parchment paper. Set up your wonton wrapping station: cutting board, and a bowl filled with cold water.

Top left clockwise: baking sheet with parchment paper, pork and shrimp filling, wonton wrapper, water, cutting board.

3. With a small teaspoon, spoon a teaspoon of the filling into the center of the wonton. Seal the wonton with water. There are two ways I like to fold my wontons:

Method 1:
Place a teaspoon of filling in the middle of the wonton wrappers. With the tip of your finger, dip it into the bowl of water and paint two adjoining edges with water so it forms a "V".
Fold the wonton in half into a triangle, making sure to squeeze out any air bubbles, press firmly and seal. Create an indent in the middle of the triangle.
Dab a little bit of water on one corner of the wonton, fold and seal. Place the wonton on the parchment paper.
Repeat with the remaining wontons. Wipe up any water from your cutting board with a paper towel.

Method 2:
Place a teaspoon of filling in the middle of the wonton wrapper. With your finger tip, brush half of the edges with water so it forms a "U".
Fold the wonton in half into a rectangle, making sure to squeeze out any air bubbles, press firmly and seal. Create an indent in the middle of the rectangle where the filling is.
Dab a bottom corner with a little bit of water, fold and seal. Place the wonton on the parchment paper.

Repeat with the remaining wontons. Wipe up any water from your cutting board with a paper towel.

4. Place wontons on the baking sheet, making sure to leave a little space between each wonton. Repeat with the wrapping the remaining wontons.

To serve:

Ingredients
Chicken, pork, seafood or vegetable broth
Sesame oil
Wontons
Broccoli, bok choy or other green leafy vegetables
1 package of egg noodles (optional, see note below)
Green onions for garnish (optional)
Hot sauce (optional)

1. In a large pot, bring the broth to a boil. Add wontons to the pot, and reduce heat to medium. Cook the wontons for 3 to 4 minutes before adding in green vegetables (broccoli, shanghai bok choy) or chopped green onions. Add a teaspoon of sesame oil to the broth and cook until the broth comes back to a boil, the vegetables are crisp tender and the wontons float. Ladle some soup and wontons into each bowl. I find that each adult needs about 9 to 11 wontons for a substantial meal and 6 to 8 wontons for a light meal.

If you want to serve egg noodles with the wontons, cook the noodles in a separate pot according to package directions. Drain and divide noodles between each bowl. Ladle soup and wontons into each bowl. If you are serving egg noodles along with wontons, you can serve less wontons for each person. I usually serve 5 wontons per adult if I am also serving egg noodles.

To Freeze:
Freeze wontons in a single layer on a cookie sheet for at least 3 to 4 hours. Once the wontons have frozen completely, you can place them in a Ziploc bag or freezer safe container. The wontons can be frozen in a freezer for up to 2 months. To cook the wontons straight from the freezer: place the frozen wontons directly into boiling broth and allow it to cook 2 to 3 minutes longer.


Source: Slightly adapted from China Sichuan Food

12.12.2015

Greek Pasta Salad with Shrimp, Feta and Roasted Veggies

The first time I made this salad, it was in the middle of August, the hottest time of the year here in Vancouver. I have no idea what prompted me to make this salad and deciding to roast the vegetables in my oven instead of turning on the BBQ.

As my house heated up, roasting veggies in my oven seemed like a really bad idea. I was sweltering from the heat, questioning my sanity. All was good once I took a bite of this pasta salad; then it all seemed worth it.

If you want to make this pasta salad in the summer, I would HIGHLY recommend grilling your vegetables and the shrimp on the BBQ grill. Or even better, grill extra vegetables and shrimp for dinner and use the leftovers in this pasta salad the next day.

I have made this recipe a few times since, and used my oven to roast the vegetables once the weather cooled off. It makes a nice, light, but satisfying meal that doesn't weigh you down. The roasted vegetables really shine through with the simple Dijon vinaigrette. You can substitute chicken in lieu of shrimp but I have to say that shrimp and roasted vegetables are a winning combo!

This pasta salad tastes delicious served either warm or cold. I find that it tastes best if it is allowed to sit for an hour or so for the pasta to absorb the flavors of the vinaigrette. Make sure to keep this salad chilled in the refrigerator.

Ingredients
2 medium zucchinis, sliced into 1/8" rounds, or half moons
1 lb cherry tomatoes, sliced in half
1 large yellow or orange bell pepper, cut into bite sized pieces (optional)
3 tbsp olive oil
Pinch of salt and pepper

1 lb wheat or gluten-free pasta (rotini, penne, or rotelle pastas all work well)
1 lb shrimp, unshelled and deveined
1 tbsp olive oil
1/2 cup kalamata olives, pitted and sliced in half
1 cup crumbled feta cheese
1/2 small red onion, finely diced

Dijon Vinaigrette
1/4 cup rice wine vinegar
2 tbsp Dijon mustard
2/3 cup extra virgin olive oil
1 large clove of garlic, finely minced
2 tbsp dried oregano
Salt and pepper to taste


Directions
1. Toss zucchini, cherry tomatoes, bell peppers in olive oil, salt and pepper. Broil in the oven on medium for 20 minutes or until the vegetables are soft and slightly charred. (An even better idea is to grill your vegetables on the BBQ, especially in the Summer!)


2. Cook the pasta according to package directions until it is al dente. Drain and rinse under cold water. Set aside.

3. Pan fry the shrimp in a tablespoon of olive oil until the shrimp is pink and cooked through. Set aside. (You can also skewer the shrimp and grill it on the BBQ.)


4. Mix the ingredients for the vinaigrette: rice wine vinegar, Dijon mustard, olive oil, garlic, oregano, salt and pepper.


5. Toss the roasted veggies, pasta, shrimp, kalamata olives, feta cheese, and red onion with the Dijon vinaigrette. Serve warm or cold.


Source: Slightly Adapted from Allrecipes

12.05.2015

Sloppy Joes

Meals at dinner time can become repetitive for most families, mine especially. We have our usual favorites: Parmesan Crusted Sole Fillets, Hellmann's Parmesan ChickenFried Rice, Chow Mein, pasta, homemade hamburgers and pizzas.

Hamburgers were on the dinner rotation until I decided to switch it up and make sloppy joes instead.  Believe it or not, until I made this recipe, I have never had sloppy joes! I had no idea what I was missing out on.

This recipe was a hit with all of us, especially my little man, who loves ketchup or any foods with lots of ketchup. Saucy, hearty and filling, this recipe is sure to please even your pickiest eaters. I served the sloppy joes on a toasted hamburger bun with a salad on the side. You can also serve it with roasted potato wedges if you are feeling rebellious.

Ingredients
1 lb lean ground beef
1/3 cup chopped onion
1 - 1-1/4 cup chopped bell peppers (I used yellow and orange bell peppers)
1/2 tsp garlic powder
1 tsp prepared yellow mustard

3/4 to 1 cup ketchup
1-1/2 tsp brown sugar
Salt and pepper to taste

4 to 6 Hamburger buns


Directions
1. In a medium non stick pan, brown the ground beef over medium heat. Drain off any liquids and fat. Add in onion, bell peppers and cook until the onions and peppers are soft.


2. Add in garlic powder, mustard, ketchup and brown sugar. Mix thoroughly. Reduce heat to low and simmer for 20 minutes. Season with additional salt and pepper.


Source: Slightly adapted from Allrecipes

11.28.2015

Grilled Chicken Avocado Wrap

Everywhere you go, everyone is offering low-carb in an effort to court the weight conscious crowd. I find that I rarely buy wraps these days since I can replicate the $8 wrap easily at home, for a fraction of the price.

I kept seeing the same recipe showing up on my Pinterest feed where I pinned the exact same recipe no less than 3 times within a month. I made a mental note to cook some extra chicken breast to make these grilled chicken avocado wraps for a quick weekend brunch.

With only 5 ingredients, this grilled wrap is as simple as it can be. I loved that it took no more than 10 minutes to assemble and heat up on the panini grill. I think the main reason why this wrap tasted so good is because it is grilled. Friends, this wrap actually tastes as amazing as it looks. It is definitely worth a bazillion repins on Pinterest.

Ingredients
4 large flour tortillas
1 large chicken breast, cooked, sliced or diced
1 large ripe avocado, cut into slices
1 cup shredded mozzarella cheese
1 fat, juicy lime
2 tbsp cilantro, finely chopped (optional)


Directions
1. Preheat a panini grill.

2. Divide the chicken breast, avocado, mozzarella cheese and cilantro equally among the four tortillas.


3. Squeeze a little lime juice over the chicken breast and avocado.


4. Wrap tightly (like a burrito, tucking in the ends) and heat on the preheated panini grill.


5. Remove from the panini grill once the ingredients have warmed through and the cheese has melted. Serve warm, eat and repeat.


Source: Adapted from Closet Cooking

11.21.2015

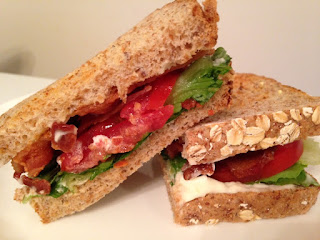
Classic BLT Sandwich

BLT sandwiches are as ubiquitous in the North American culture as peanut butter and jelly sandwiches. Writing a recipe for a BLT sandwich seems wrong as the name, BLT, (which stands for Bacon, Lettuce and Tomato) pretty much indicates what is in the sandwich.

For those of my readers who are not familiar with the BLT sandwich, you are missing out. It's high time you tried this easy and delicious sandwich.

I believe there are a few key things that separates an average BLT sandwich from an amazing BLT sandwich. The most important thing is to use a hearty and thickly sliced bread. Sourcing good quality thick cut bacon and using real mayonnaise are my other two must haves. If you can, buy tomatoes in season as they taste more flavorful. For the lettuce, I like using romaine lettuce but you can use other varieties such as iceberg, butterhead or green leaf.

Quick and ready in under 10 minutes, this sandwich is perfect for those who want lunch in a hurry.

Ingredients
2 slices hearty bread
2 slices of thick cut bacon (can substitute turkey bacon)
2 slices of tomato
1 lettuce leaf, washed and dried
1 tbsp of mayonnaise


Directions
1. Toast the bread in a toaster until golden brown.

2. In a microwave or pan, cook the bacon. Try this tip to cook bacon in 90 seconds.

3. Spread the mayonnaise on both slices of bread. Place lettuce, then tomatoes on one slice of bread. Place the bacon on the other sliced bread. Place the mayonnaise/bacon side down and cut the sandwich in half.


Source: Frugal Allergy Mom

11.14.2015

Buffalo Cauliflower Bites

It is no secret my husband and I love chicken wings. We could eat chicken wings by the dozens on a daily basis if it wasn't for the fact it isn't healthy to consume copious amounts of chicken wings or the fact it can become an expensive habit.

For those who are as addicted to chicken wings as we are, I have a healthier and cheaper alternative for you. These buffalo cauliflower bites are healthier, cheaper than the traditional buffalo wings which uses chicken wings. After making this more than half a dozen of times, my husband and I agree that it tastes very similar to buffalo chicken wings. Good for your heart and good for your wallet. I could eat dozens of these!

Ingredients
1 medium head of cauliflower, washed and cut into florets

Batter
1 cup all purpose flour
1 cup cold water
1 tsp garlic powder
1/2 tsp salt

Buffalo Sauce
3 tsp butter
1/2 cup Franks RedHot Original Cayenne Pepper Sauce


Directions
1. Preheat the oven to 450 degrees F.

2. In a large bowl, mix flour, water, garlic powder and salt.


3. Coat each cauliflower floret in the batter and shake off any excess batter. I like to put coated cauliflower in a separate bowl and allow the excess batter drip off on their own.


4. Place cauliflower florets on a large greased baking sheet, making sure not to overcrowd the pan. Bake for 20 minutes until golden.


5. In a small saucepan, melt butter. Stir in Franks RedHot Sauce until well mixed.


6. Toss cauliflower florets with the hot sauce mixture until it is evenly coated. Return the cauliflower to the oven and bake for 10 minutes until the cauliflower is crisp.


7. Serve with celery sticks and blue cheese dressing.


Source: Slightly adapted from Franks RedHot

11.07.2015

Sweet Corn and Black Bean Salad

This is the salad that I have been eating all summer long. Well, ever since I discovered it at my Sister-In-Law's house back in June.

My Sister-In-Law always serves at least two amazing salads at her dinner parties. The list of salads on her menu rotate as she experiments with different recipes. This leads me to constantly asking her for recipes and helping myself to countless servings shamelessly as a dinner guest. My worst offense has been with this particular salad, where I was responsible for eating most if not all of it. If I recall correctly, other people wanted a second serving as well. Well, first come first served.

Since I couldn't get enough of this salad at my Sister-In-Law's, I had to make it for myself many times to satiate those pesky cravings.

This salad taste best when you use fresh, in season corn and tomatoes. Serve this salad as a side or a main entree, as it's guaranteed to please even the fussiest eaters. I hope your guests will be a little more considerate than I was at sharing.

Ingredients
2 corn off the cob (check out how to cook corn in 3 minutes) or 12 oz (360 ml) can of peaches and cream corn, rinsed and drained
3 vine-ripened tomatoes, diced into small pieces
12 oz (360 ml) can black beans, rinsed and drained
1/4 cup finely minced red onion
1/8 cup chopped cilantro (optional)

1 large avocado, peeled, pitted and chopped into bite sized pieces

Dressing
1/4 cup fresh lime juice
2 tbsp vegetable oil
1 tsp ground cumin*
1/2 tsp sea salt
1/2 tsp freshly ground pepper

Directions
1. Combine corn kernels, tomatoes, black beans, red onion and cilantro in a bowl.


2. Mix the ingredients for the dressing in a small bowl. Pour the dressing into the vegetables and mix. Allow the salad to marinate for at least 30 minutes to 1 hour in the refrigerator for best flavor. Stir in the avocado right before serving.


*For those with peanut and/or tree nut allergies, Clubhouse/McCormick sells spices free of peanuts and tree nuts. This may change without notice, please check with company for up to date information and always read all labels carefully before consuming.

Source: Lola via Frugal Allergy Mom

9.19.2015

Chinese Fresh Fruit Cake

We all want to feel like we belong. Nothing can be more true than my longing for others to include my nut-allergic little man at social gatherings involving food. In the food allergy world, we keep hearing, "exclude the food, not the child". While I wholeheartedly agree that we should exclude the food, the practicality of this in a society centered around food often makes this task impossible. Since food is part of the social norm and how we bond, I often wondered why don't we adapt the food or find an allergy friendly alternative so a food allergy child can be included?

For the past year or so, Chinese fresh fruit cake seems to be the cake of choice. No, this is not the fruit cake that gets passed around at Christmas like a hot potato. This cake is light and slightly sweet, decorated with slices of fresh fruit and frosted with fresh whipping cream sandwiched between two layers of light and fluffy sponge cake. This is the good stuff. And it generally costs a pretty penny, averaging $30-$40 for a 7" cake at a reputable Chinese bakery in Vancouver.

At these events, while everyone chows down on the cake, my little man always looks at me with a glimmer of hope. I would whisper to him that it may contain nuts (as certain bakeries decorate their fresh fruit cake with sliced almonds). At 2 years of age, he is learning to accept that he cannot eat certain foods. As usual, I always have a safe snack available and he is happy that I had thought to include him. I have noticed that as he grows older, he notices everyone happily sharing the same treat while he is given something different. I feel the exclusion too when my little man is excluded from these events. Sometimes, I would eat the same safe snack as my little man to show him a little solidarity.

Hence my need to learn to make this darned fresh fruit cake.

To be honest, I have always been intimidated by how labour intensive it is to make a Chinese fresh fruit cake. However, after I made it three times, I realized that making this cake is no different than any other cake I have made. In fact, I have found that this cake is quite easy, provided that you carefully read all the instructions and follow it.

My Adaptations
  • I found the original recipe to be quite sweet and halved the sugar in the whipping cream recipe.
  • Due to my personal preference, I would highly recommend using clear vanilla for a prettier cake. If you do not have clear vanilla, regular vanilla will work just fine. 
  • I also did not use almonds in my finished cake as my little man has a nut allergy. In lieu of almonds, you can use dried coconut flakes or shaved chocolate to decorate the sides. Please make sure to read the labels to avoid cross contamination. I opted to leave the sides undecorated to let the flavors of fresh fruit shine through. 
  • Lastly, I altered the whipping cream ingredients and directions to give it a smoother professional finish. I have to give full credit to my resourceful Mother-In-Law who helped me elevate the whipped cream to a professional bakery consistency.

Most of all, I want to thank Mika at 350 Degree Oven for posting and sharing this wonderful recipe. Armed with Mika's recipe, my little man was finally able to have a slice of Chinese fresh fruit cake, just like everyone else.


Ingredients
6 large eggs, separated
12 tablespoon white sugar, divided
1/2 tsp table salt
1 tsp clear vanilla extract (regular vanilla extract will work as well)
1/2 cup cold water
1/3 cup canola oil
1 cup cake flour (do not substitute in AP flour)
1 tsp baking powder
1/4 tsp cream of tartar  

475 ml (~1 pint) heavy whipping cream
3 tbsp white sugar
3.5 g (1/2 package) gelatin
2-3 drops cold water
1/8 tsp hot water

Fresh fruit to decorate: strawberries, raspberries, blueberries, blackberries, kiwi, peach/necterine, cantaloupe or honeydew (you generally want to use fruits with a soft flesh). Please do not use canned, frozen or dried fruit in this cake.

1 cup chopped fresh fruit (I usually like to use the same fruit as I used to decorate the cake. This is the perfect place to use those end pieces not suitable for decoration).


Directions
1. Separate the egg yolk from the egg white; be careful not to contaminate the egg white with any egg yolk otherwise the egg whites will not whip properly. I like using my hands to separate the egg yolk from the egg white. I always use three bowls: one for the egg yolks, one for the egg whites and one bowl for the egg that I just cracked to check to make sure the egg white in the bowl is not contaminated. This way, if you have some egg yolk in the egg whites, you can easily discard the contaminated bowl without having to discard your whole batch.


2. To the bowl of egg yolks, add 6 tablespoons of sugar, 1/2 tsp of salt, 1 tsp of clear vanilla extract.


3. Using a hand blender, beat the egg yolks until the mixture is smooth.


4. Add 1/2 cup cold water and 1/3 cup canola oil to the egg yolk mixture. Beat until smooth.


5. In a bowl, sift the cake flour and baking powder.


6. Pour the sifted flour mixture into the egg yolk batter and beat until just combined; do not over mix. I personally prefer to beat the mixture until only a few traces of flour remain and folding the rest of the batter by hand with a spatula.


7. Detach your whisks and wash it thoroughly in warm soapy water. Dry the whisks thoroughly with a paper towel to remove all traces of oil and fat.


8. Preheat the oven to 350 degrees.

9. With your clean and dry whisks, beat the egg whites, 6 tablespoons sugar and 1/4 tsp cream of tartar until the egg whites are stiff. This can take a while, up to 3 to 5 minutes in some cases. Be patient.


10. Using a flat spatula, stir in 1/3 of the egg whites into the egg yolk batter.


11. Then, gently fold (using figure 8 motions) in another 1/3 of the egg whites.


12. Lastly, gently fold in the remaining egg whites with your spatula. Do not over mix. It is okay if your cake batter has streaks of egg white throughout. Over mixing will result in a denser cake which is the antithesis of what we want to achieve.


13. Do not grease or flour your cake pans. Divide the batter evenly between 2 cake pans. I used two 9" round cake pans but 8" cake pans work just as well (you will need to adjust the baking time).


14. Bake for 25 to 35 minutes, depending on your oven. In my oven, it took 30 minutes to bake two 9" cake pans. I have also tested switching the cake pans half way through and have found that leaving the cakes alone to bake uninterrupted worked the best. Bake until the sides of the cake look like they are pulling away from the cake pan.


15. Allow the cakes to cool upside down on a cooling rack. This step is important as otherwise the cake will deflate if allowed to cool upright.


16. Once the cake has cooled completely, run a knife along the edge of the cake pan to loosen it. At this point, you can either use it right away or store it in the fridge in a tight lidded container lined with parchment paper for up to a day. If you choose the latter option, make sure to take the cake out of the refrigerator at least 30 minutes before you frost the cake.


17. In a small bowl, mix gelatin with a few drops of cold water (no more than 3 drops). Stir in a 1/8 tsp of hot water to dilute it.


18. In a large bowl, pour in the whipping cream. Beat until the whipping cream forms soft peaks. Add in 3 tablespoons of sugar and beat until the whipping cream is just about to form stiff peaks. Pour in the gelatin mixture and beat until the gelatin is mixed in and the whipped cream forms stiff peaks. The gelatin helps to stabilize the whipped cream and give it a smoother finish.


19. In a small bowl, mix in 1 cup of whipped cream with 1 cup of fresh fruit.


20. Place the cake right side up on a cake board or a cutting board covered with aluminum foil. Using an offset spatula, spread a thin layer of whipped cream on the top. Then spread the fresh fruit and whipped cream mixture evenly over the cake.


21. Place the second cake upside down on top of the fresh fruit mixture. Frost the top and sides with whipped cream.


22. Place the whole cake in the fridge uncovered to allow the whipped cream to firm up for at least 15 to 30 minutes.


23. Meanwhile, slice and prepare the fresh fruit. Place the sliced fruit on a clean and dry paper towel to absorb any excess moisture. I should note that you should only use fresh fruit, not canned, not frozen, and certainly not dried fruit. The best thing to do is to use fruits in season as they are the most economical, and taste the best.

24. Take the cake out of the fridge and smooth the whipped cream with an offset spatula. Decorate with sliced fruit. At this point, you can either chill the cake for up to 4 hours (cover with a loose lid to prevent the cake absorbing other smells from your fridge) or serve the cake right away for immediate consumption. Now it's time for me to go work off all the calories from eating three cakes within one week!!


Source: Adapted from The 350 Degree Oven