Twitter Pinterest Instagram Facebook

2.28.2015

How to Freeze Individual Servings of Bacon

We love bacon in our household. So much so that I purchase bacon when it is on sale and freeze the whole package until we need it. This presents a problem when I only need a few strips of bacon for a recipe. What I used to do was defrost the whole package of bacon and eat the rest. Is this a first world problem?

But wouldn't it be nice if you could stretch that package of bacon a little more and freeze them individually?

Here's a neat trick I saw a few years ago online which works well when you only need a few strips of bacon.


IngredientPackage of bacon, fresh

Materials
Plastic wrap
Ziploc bag

Directions
1. Take bacon out of the package. Roll two slices of bacon together tightly and place on a plate. Repeat.


2. Wrap each bundle of rolled bacon tightly with plastic wrap. Insert into Ziploc bag and squeeze out any air inside the bag. Label and date. Freeze for up to 3 months.


3. When ready to use, thaw out the bacon in the fridge or defrost in the microwave.

2.27.2015

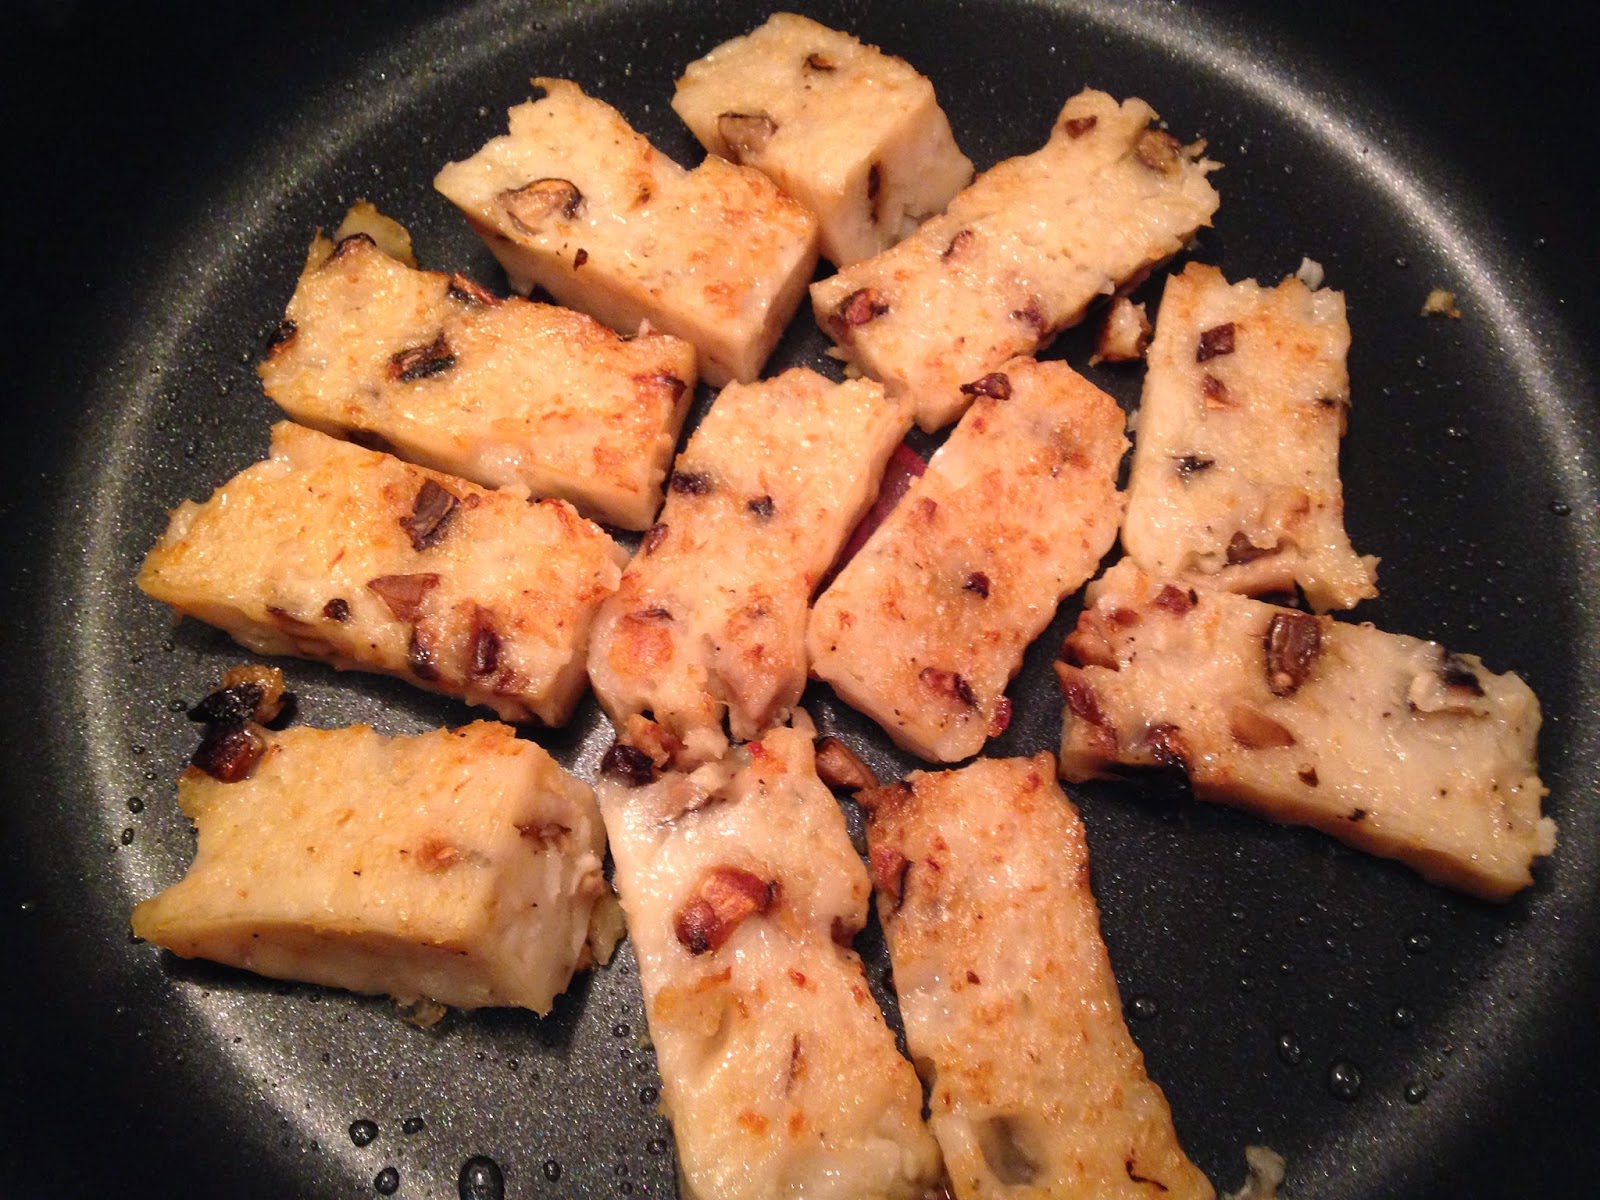
Chinese Turnip Cake (Lo Bak Gaw/Luo Bo Gao)

One of my favorite dishes at dim sum is Chinese Turnip Cake. It is also commonly referred as Lo Bak Gou or Luo Bo Gao. For Chinese New Year, families will often eat Turnip Cake to have good fortune for the upcoming year.

I have always purchased store bought Chinese Turnip Cake for Chinese New Year and pan fried it at home. This is the first year I made Turnip Cake from scratch.

My mother in law has made Lo Bak Gaw many times so I sought her expertise. Based on her description of the process, it did not appear to be hard, but it sounded like it did required a bit of prep work.

With her encouragement and a quick Internet search, I found a recipe that is relatively easy to execute if you follow the steps closely. Since I did not have an 8 inch cake or souffle pan, I used my 6 inch cake pan instead and made two Turnip Cakes.

Making your own Turnip Cake requires more work, but it tastes much better than any store bought version.


Ingredients
1 large Chinese white turnip (about 2 pounds)
8 large Chinese dried shitake mushrooms
1/2 cup Chinese dried shrimp
2 tbsp vegetable oil
2 tsp Chinese rice cooking wine (like Shaoxing Cooking Wine)
1 tsp sugar
1 tsp salt
2 cups rice flour (commonly found at Asian markets)


Directions
1. Peel the turnip and grate (or cut into thin matchsticks) so it makes up 4-1/2 cups.

2. In a large pot, combine the grated turnip and 1 quart (or just under 1 litre) of cold water, bring to a boil over high heat. Reduce heat to low, cover, and simmer for 30 minutes or until the turnip is tender. Drain, reserve 1 cup of the cooking liquid.


3. In bowl, soak the shitake mushrooms with enough hot water to cover. Cover the bowl with a plate and let the mushrooms soak for at least 30 minutes or until the mushrooms are soft.


4. In another bowl, soak the dried shrimp in 1/2 cup cold water for 30 minutes or until it is softened.


5. Set the mushrooms aside and filter the mushroom soaking liquid through a sieve lined with a coffee filter or cheesecloth.  Reserve 1/2 cup of the mushroom liquid. Wash mushrooms under running water and squeeze dry. Dice the mushrooms. Set aside.


6. Drain the dried shrimp and reserve 1/2 cup of the soaking liquid. Finely chop the dried shrimp and set aside.

7. In a wok or skillet over medium heat, add the vegetable oil.


8. Add in diced mushrooms, shrimp and stir fry for 2 to 3 minutes until the mushroom is soft and the shrimp is fragrant.


9. Pour in the rice cooking wine, sugar and stir to combine.

10. Add the cooked drained turnip to the skillet. Stir to combine.


11. In a large bowl, mix the rice flour, 1/2 cup of each of the reserved mushroom soaking liquid and shrimp soaking liquid. Stir until the batter is smooth. Then stir in 1 cup of the hot turnip broth.


12. Pour the batter into the skillet, add salt and stir until combined. The batter will have the texture of rice pudding.


13. Line the bottom of an 8 inch cake pan (or souffle dish with straight sides) with a piece of parchment paper.


14. Pour the batter into the cake pan. Smooth the batter with a spatula.


15. Bring water to a boil in a large steamer or a pot large enough to fit the cake pan without touching the sides. Carefully place the pan into the steamer, cover, reduce heat to medium-low and steam for 1 hour or until the cake is just set and is firm to the touch. Make sure there is enough water and replenish with hot water if necessary.


16. Remove the pan from the steamer and allow it to cool for an hour in a sink filled with cold water.


17. Cover with plastic wrap and refrigerate for at least 3 to 4 hours.

18. Run a flat spatula along the edge of the cake to loosen the sides.


19. Invert to unmold. Peel off the wax paper, wrap in plastic wrap and refrigerate until ready to use.


To serve
1. Slice the cake in half and cut crosswise into 1/2 inch thick slices.


2. In a large skillet, heat 2 tbsp of vegetable oil over medium heat until the pan is hot.


3. Place the turnip cake slices into the skillet and cook each side until it is golden brown and crispy. Flip to cook the other side.


4. Serve hot on its own or with oyster sauce and sriracha hot sauce.


Source: Slightly adapted from Epicurious

2.26.2015

Taiwanese Meat Sauce (Chinese Spaghetti)

I bought a Costco sized pack of ground pork which needed to be used up. Initially, I had intended to make wontons with it but life got in the way.

I searched the Internet for some recipes and most of the pork recipes seem to be more complicated than I had time for, or needed ingredients that I did not have on hand.

Then I stumbled across a Taiwanese Meat Sauce recipe. It was just the recipe I was looking for: quick to prepare plus I had all of the ingredients on hand. It was a tasty meal that we'll sure to make again.


Ingredients
454 g fresh or dried noodles (I used spaghetti) or rice
3/4 cup reserved shitake mushroom liquid or vegetable broth
2 tbsp dark soy sauce
2 tsp light (regular) soy sauce
1 tsp Chinese black vinegar (or balsamic vinegar)
1/2 tsp Chinese five spice powder
1 tbsp brown sugar
2 tsp cooking oil
1/2 onion, chopped
1 lb lean ground pork
2 cloves garlic, finely minced
120 g dried shitake mushrooms*

Cornstarch Slurry
1 tbsp corn starch
1/4 cup cold water

*Note: If you do not have shitake mushrooms, you can use fresh portabello, cremini or white button mushrooms.

Directions
1. In a big bowl, soak the dried shitake mushrooms with just enough hot water to cover. Place a plate over the bowl and allow the mushrooms to soak for 30 minutes. Reserve liquid. Wash the mushroom under running water, squeeze dry and dice.


2. Boil water in a large pot and cook the noodles according to package directions. Drain.

3. Combine 3/4 cup of reserved shitake liquid, dark soy sauce, light soy sauce, vinegar, five spice powder and brown sugar in a bowl. Set aside.

4. In a large pan over medium-high heat, add oil.


5. Stir in the onion and cook until it is translucent.


6. Stir in the ground pork and cook until it is no longer pink.


7. Create a space in the middle of the pan to cook the garlic. Stir fry until it is fragrant.


8. Add in the mushrooms and cook until the mushrooms are soft.


9. Pour in the liquid mixture, stir and bring the contents to a simmer.


10. In a small bowl, mix corn starch and cold water. Create a well in the middle of the mixture and add the corn starch slurry. Bring to a boil. Once it reaches a boil, allow it to simmer for 10 minutes. Serve hot over noodles or rice.


Source: Slightly adapted from Steamy Kitchen

2.25.2015

Crockpot Congee

In the week leading up to Chinese New Year, my little man came down with a runny nose and cough. I felt so bad for him.

When my little man is sick, all he wants is someone to cuddle and hold him. I love cuddling and holding him but it presents some challenges, especially when I am home alone with him. While cleaning can always wait when my little man is sick, we still need to eat.

This is where the crockpot comes in.

You put the rice, frozen (or fresh) chicken breast and water in the crockpot. Turn it on and go cuddle and hold your sick little ones (or whatever else you have going on).

In about 4 to 6 hours, the congee will be ready. It's perfect for those days when you have your hands full.

Just what Dr. Mom ordered.

Ingredients
1-1/4 cup white rice
10 cups water
1 large chicken breast, fresh or frozen

Directions
1. Wash rice until the water runs clear.

2. Add rice, water and chicken breast into the crockpot.


3. Turn to low and cook for 4 to 6 hours until the rice breaks down.

4. Take the chicken out and shred with two forks. Return the shredded chicken back to the crockpot.


5. Stir the chicken in. Serve hot.

Add some soy sauce and pickled vegetables, mmm mmm good!

2.24.2015

In Memory

My late grandmother loved pink cherry blossoms.

Today would have been my late grandmother's 85th birthday. As the matriarch of our family, she played an integral role in my upbringing and I worshiped her. Every year since she passed away seven years ago, the two days that are the hardest for me are her birthday (February 24th) and the day she passed away (October 2nd). Life moves on for most people, but for me, these two days are one of remembrance.

You see, her absence is a constant reminder that we should cherish those we love. There is a saying that you should give those you love your "presence" and not "presents". This is very true of my relationship with my late grandmother as she always made time for me, no matter how busy she is. When my late grandmother was alive, I would call her to ask for advice on everything and she would always call me to chat. My late grandmother was a religious woman, and she give up her Friday night worship if I went home to visit on a weekend. To her, spending time with someone is the most important thing in the world.

So on what would have been her 85th birthday, I am taking some time from my day to remember the woman who loved me and raised me. I miss you, I love you and I will always remember you, grandma.

2.23.2015

Vegetarian Shitake Mushroom Lettuce Wraps

I make lettuce wraps on a regular basis. One, I love how easy it is to make it. Two, it tastes absolutely delicious. Lastly, you can make it ahead of time and eat over the next few days (if it lasts that long).

Normally, I make lettuce wraps with ground beef. But for Chinese New Year, I decided that I wanted vegetarian lettuce wraps and used dried shitake mushrooms instead. Wow, I did not expect it to be that good. I am a carnivore at heart but these shitake Mushroom Lettuce Wraps have won me over. As I was stuffing my face with this lettuce wrap, the only thought that ran across my mind was "Yum, I should have made more."


Ingredients
6 whole lettuce leaves (iceberg or butter lettuce)
12 large dried shitake mushrooms
1 tbsp vegetable oil
1 small onion, small dice
1/4 cup hoisin sauce
2 cloves fresh garlic, finely minced
1 tbsp soy sauce
1 tbsp rice wine vinegar
1/4 medium green onion, sliced
1 (8 ounce) can water chestnuts, drained, small dice
2 tsp sesame oil

Serve With:
Hoisin sauce
Sriracha hot sauce

Directions
1. In a large bowl, soak shitake mushrooms with enough hot water to cover for at least an hour.

2. Wash the mushrooms under running water until it is clean. Dice dried mushrooms into small pieces and set aside.

3. Wash lettuce leaves and pat dry. Try to keep them whole and not tear them. Set aside.

4. Pour oil to a medium skillet over medium-high heat. Once the oil is hot, add diced onions and cook until the onions are translucent.


5. Add the shitake mushrooms and cook for about 5 minutes.


6. Stir in hoisin sauce, garlic, green onions, soy sauce, and rice wine vinegar into the skillet until it is well mixed.


8. Add water chestnuts and sesame oil. Cook until the sauce is thickened.


9. Serve with lettuce leaves. Drizzle hoisin sauce and/or Sriracha sauce over the mushroom mixture.


Source: Adapted from Allrecipes

2.22.2015

Bacon and Cheese Stuffed Mushrooms

When I started this blog 200 days ago, I never imagined that I would enjoy blogging as much as I do now. Not only has writing a blog post every day helped me document family recipes, it has also helped me discover new friends and new recipes.

So, to celebrate my 200th post, I am posting this delicious Bacon and Cheese Stuffed Mushroom recipe. This recipe really does not need any up-sell: bacon and cheese stuffed into a mushrooms, how can anyone not like it? This recipe will definitely be part of any future celebration I am hosting!


Ingredients
12 whole fresh mushrooms, cleaned and patted dry
2 slices of bacon, cooked and finely chopped (try this 3 minute recipe)
1 tbsp vegetable oil
1 tbsp minced garlic
1/2 (4 ounce) package cream cheese, softened
1/4 cup grated Parmesan cheese
1/4 tsp ground black pepper
1/4 tsp onion powder

Directions
1. Preheat oven to 350 degrees F.

2. Lightly coat a baking dish with oil or line a baking sheet with cooking spray.


3. Carefully break off the mushroom stems and finely chop.


4. Heat oil in a large skillet over medium heat. Saute garlic and mushroom stems until it is soft. Set aside to allow the mixture to cool before proceeding to the next step.


5. Stir in cream cheese, Parmesan cheese, black pepper and onion powder once the mushroom mixture has cooled down.


6. Use a small teaspoon to fill each mushroom cap with a generous amount of stuffing.


7. Bake for 20 minutes or until the mushrooms are piping hot and the mixture is bubbly.


Source: Slightly adapted from Allrecipes