Meals at dinner time can become repetitive for most families, mine especially. We have our usual favorites: Parmesan Crusted Sole Fillets, Hellmann's Parmesan Chicken, Fried Rice, Chow Mein, pasta, homemade hamburgers and pizzas.
Hamburgers were on the dinner rotation until I decided to switch it up and make sloppy joes instead. Believe it or not, until I made this recipe, I have never had sloppy joes! I had no idea what I was missing out on.
This recipe was a hit with all of us, especially my little man, who loves ketchup or any foods with lots of ketchup. Saucy, hearty and filling, this recipe is sure to please even your pickiest eaters. I served the sloppy joes on a toasted hamburger bun with a salad on the side. You can also serve it with roasted potato wedges if you are feeling rebellious.
Ingredients
1 lb lean ground beef
1/3 cup chopped onion
1 - 1-1/4 cup chopped bell peppers (I used yellow and orange bell peppers)
1/2 tsp garlic powder
1 tsp prepared yellow mustard
3/4 to 1 cup ketchup
1-1/2 tsp brown sugar
Salt and pepper to taste
4 to 6 Hamburger buns
Directions
1. In a medium non stick pan, brown the ground beef over medium heat. Drain off any liquids and fat. Add in onion, bell peppers and cook until the onions and peppers are soft.
2. Add in garlic powder, mustard, ketchup and brown sugar. Mix thoroughly. Reduce heat to low and simmer for 20 minutes. Season with additional salt and pepper.
Source: Slightly adapted from Allrecipes
Frugal Mom To a Nut Allergic Child. Recipes, frugal finds, child development and food allergy management. Posts weekly.
Showing posts with label Beef. Show all posts
12.05.2015
2.21.2015
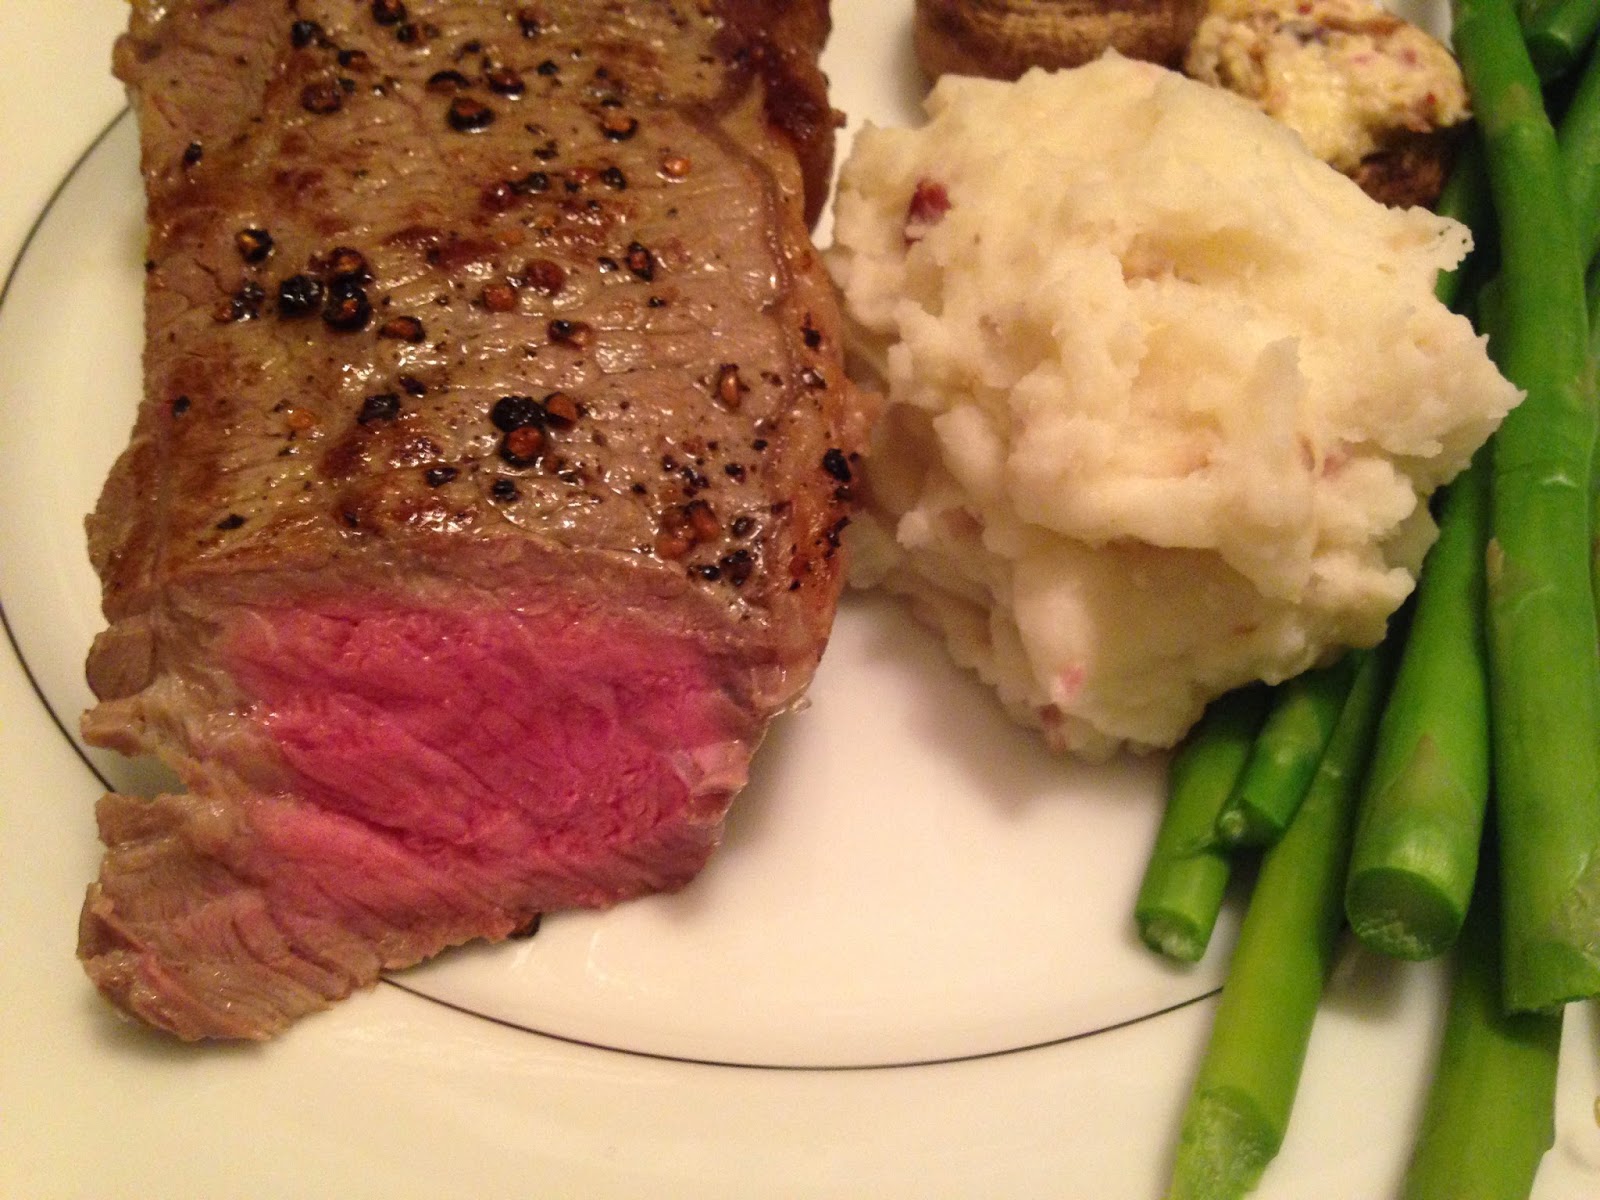
5 Minute Cast Iron Grilled Steak
I love my cast iron skillet. It is the best investment I have spent on a pan. Unlike my nonstick, which I have to replace every year, my cast iron skillet will be with me for a long time. The versatility of cast iron is amazing, as it can go easily from stovetop to oven. If you have a cast iron skillet or are curious what type of recipes cast iron skillets can make, check out my cast iron recipes here.
For Valentine's Day, I purchased a jumbo pack of strip loin steaks which was on sale. Each steak weighs about a pound. I looked for a recipe online that allowed me to use my favorite skillet to cook my steaks and came across this Alton Brown recipe. The beauty of this recipe is that the steak takes only 5 minutes to cook; great for any night really. Cast iron for the win again!
Ingredients
Steak (1 inch thick)
Oil
Salt and pepper, to taste
Directions
1. Take the steaks out of the refrigerator 20 minutes before cooking to allow the meat come to room temperature. This allows the steak to cook evenly.
2. Place the cast iron skillet in the oven and preheat to 500 degrees F.
3. Lightly oil the steaks and season with salt and pepper on both sides.
4. Once the oven temperature reaches 500 degrees, take the cast iron skillet out of the oven.
5. Turn the stove to high and heat the cast iron skillet for 3 minutes or until it just starts smoking. Do not add any oil to the skillet.
6. Place steaks on the cast iron skillet and sear for 30 seconds.
7. Flip and sear the other side for another 30 seconds.
8. Once both sides have been seared, place the steak in the oven and cook for 2 minutes.
9. Take the steak out of the oven, flip and cook for another 2 minutes in the oven.
10. Remove steak from the cast iron skillet and allow it to rest on a plate loosely covered with tinfoil for 5 minutes before serving. Are you hungry yet?
Source: Food Network
For Valentine's Day, I purchased a jumbo pack of strip loin steaks which was on sale. Each steak weighs about a pound. I looked for a recipe online that allowed me to use my favorite skillet to cook my steaks and came across this Alton Brown recipe. The beauty of this recipe is that the steak takes only 5 minutes to cook; great for any night really. Cast iron for the win again!
Ingredients
Steak (1 inch thick)
Oil
Salt and pepper, to taste
Directions
1. Take the steaks out of the refrigerator 20 minutes before cooking to allow the meat come to room temperature. This allows the steak to cook evenly.
2. Place the cast iron skillet in the oven and preheat to 500 degrees F.
3. Lightly oil the steaks and season with salt and pepper on both sides.
4. Once the oven temperature reaches 500 degrees, take the cast iron skillet out of the oven.
5. Turn the stove to high and heat the cast iron skillet for 3 minutes or until it just starts smoking. Do not add any oil to the skillet.
6. Place steaks on the cast iron skillet and sear for 30 seconds.
7. Flip and sear the other side for another 30 seconds.
8. Once both sides have been seared, place the steak in the oven and cook for 2 minutes.
9. Take the steak out of the oven, flip and cook for another 2 minutes in the oven.
10. Remove steak from the cast iron skillet and allow it to rest on a plate loosely covered with tinfoil for 5 minutes before serving. Are you hungry yet?
Source: Food Network
1.30.2015
Easy Shepherd's Pie
One of the key things I have learnt over the last few months to save time in the kitchen is Cook Once, Eat Twice (or many times). This means cooking a protein, vegetable or carbohydrate one night and using the leftovers for another dinner. This not only reduces the amount of work you need to do for dinner prep but also keeps your family happy with a little variety at the dinner table.
I had leftover mashed potatoes from the previous night when I made Pork Chops with Goat Cheese Gravy. It has been a while since I have made shepherd's pie so I decided to make it for dinner that night.
This meal had my husband jumping for joy. The cheesy mashed potatoes and vegetables over ground beef in a saucy gravy makes a delicious meal that is sure to make your family happy. The best part was that we even managed to have some leftovers (after my husband had second and third helpings) for lunch the next day.
Ingredients
5 cups leftover mashed potatoes
3 cups frozen vegetable mix (peas, carrots, corn, etc)
1 tbsp vegetable oil
1 onion, chopped
1 lb lean or extra lean ground beef
3 tbsp all-purpose flour
2 tbsp ketchup
1 cup beef broth
1/2 cup shredded Cheddar cheese
Salt and pepper to taste
Directions
1. Preheat oven to 375 degrees F.
2. Bring a pot of water to a boil over high heat. Add in frozen vegetables and blanch the vegetables for a few minutes. Drain and set aside.
3. In a large pan over medium-high heat, add oil.
4. Add onions and cook until it is translucent.
5. Mix in the ground beef and cook until it is no longer pink. Drain any excess fat. Stir in the flour and cook until the flour is mixed in.
6. Add in ketchup and beef broth. Bring to a boil and reduce heat to medium. Season with salt and pepper and simmer for 5 minutes until the sauce is thick.
7. Spread the ground beef mixture in an even layer on the bottom of a 3 quart casserole dish. Then spread on a layer of vegetable mix. Finally, spread mashed potatoes and sprinkle the shredded cheddar cheese on top.
8. Bake for 25 to 30 minutes until golden brown.
Source: Slightly adapted from Allrecipes
I had leftover mashed potatoes from the previous night when I made Pork Chops with Goat Cheese Gravy. It has been a while since I have made shepherd's pie so I decided to make it for dinner that night.
This meal had my husband jumping for joy. The cheesy mashed potatoes and vegetables over ground beef in a saucy gravy makes a delicious meal that is sure to make your family happy. The best part was that we even managed to have some leftovers (after my husband had second and third helpings) for lunch the next day.
Ingredients
5 cups leftover mashed potatoes
3 cups frozen vegetable mix (peas, carrots, corn, etc)
1 tbsp vegetable oil
1 onion, chopped
1 lb lean or extra lean ground beef
3 tbsp all-purpose flour
2 tbsp ketchup
1 cup beef broth
1/2 cup shredded Cheddar cheese
Salt and pepper to taste
Directions
1. Preheat oven to 375 degrees F.
2. Bring a pot of water to a boil over high heat. Add in frozen vegetables and blanch the vegetables for a few minutes. Drain and set aside.
3. In a large pan over medium-high heat, add oil.
4. Add onions and cook until it is translucent.
5. Mix in the ground beef and cook until it is no longer pink. Drain any excess fat. Stir in the flour and cook until the flour is mixed in.
6. Add in ketchup and beef broth. Bring to a boil and reduce heat to medium. Season with salt and pepper and simmer for 5 minutes until the sauce is thick.
7. Spread the ground beef mixture in an even layer on the bottom of a 3 quart casserole dish. Then spread on a layer of vegetable mix. Finally, spread mashed potatoes and sprinkle the shredded cheddar cheese on top.
8. Bake for 25 to 30 minutes until golden brown.
Source: Slightly adapted from Allrecipes
1.23.2015
Freezer Friendly Beef, Cheese & Beans Burritos
I love make-ahead meals, especially ones that require "virtually" no extra effort. Most of my make-ahead meals involve prepping an extra meal when I am preparing dinner. This time, I went out of my way to make these freezer burritos. The homemade version is healthier and cheaper; great for those nights when you need a quick dinner. Making these burritos made me hungry so I decided we would have beef burritos for dinner that night (see picture at the bottom of the post).
Ingredients
8 large 10" tortillas
1-1/2 lb ground beef, lean or extra lean
1 medium onion, diced
1/2 tsp ground cumin
1/2 tsp ground oregano
1/4 tsp salt
1 tbsp oil
2 cups refried beans (try this homemade refried beans recipe) or 1 can of refried beans (398 ml/14 oz)
2 cups shredded cheese (I used mozzarella but you can use any cheese)
Directions
1. Pour 1 tablespoon of oil in a pan over medium high heat.
2. Add in the onion and saute until the onions are soft and translucent.
3. To the same pan, add in the ground beef, cumin, oregano, salt and cook the ground beef is no longer pink.
4. Heat the tortillas in the microwave with a damp paper towel. Remove.
5. Equally divide the ingredients among the 8 tortillas. Layer the ground beef, then refried beans and shredded cheese in each tortilla.
5. Fold over the ends of the tortilla and roll them up. Repeat with the rest of the tortillas.
6. Wrap each burrito tightly with plastic wrap and place in a Ziploc freezer bag. Store for up to 2 months. Remember to date and label your Ziploc bag.
Reheating Instructions
Microwave: Remove plastic wrap and heat in the microwave for 2 to 3 minutes.
Oven: Preheat oven to 350 degrees F. Remove plastic wrap and wrap the burrito in aluminium foil. Heat for 30 minutes until cooked through.
Serve with sour cream, salsa and shredded lettuce.
Source: Adapted from Money Saving Mom
![]() |
| Mise en place: ground beef, cheese, refried beans and tortillas. |
Ingredients
8 large 10" tortillas
1-1/2 lb ground beef, lean or extra lean
1 medium onion, diced
1/2 tsp ground cumin
1/2 tsp ground oregano
1/4 tsp salt
1 tbsp oil
2 cups refried beans (try this homemade refried beans recipe) or 1 can of refried beans (398 ml/14 oz)
2 cups shredded cheese (I used mozzarella but you can use any cheese)
Directions
1. Pour 1 tablespoon of oil in a pan over medium high heat.
2. Add in the onion and saute until the onions are soft and translucent.
3. To the same pan, add in the ground beef, cumin, oregano, salt and cook the ground beef is no longer pink.
4. Heat the tortillas in the microwave with a damp paper towel. Remove.
5. Equally divide the ingredients among the 8 tortillas. Layer the ground beef, then refried beans and shredded cheese in each tortilla.
5. Fold over the ends of the tortilla and roll them up. Repeat with the rest of the tortillas.
6. Wrap each burrito tightly with plastic wrap and place in a Ziploc freezer bag. Store for up to 2 months. Remember to date and label your Ziploc bag.
Reheating Instructions
Microwave: Remove plastic wrap and heat in the microwave for 2 to 3 minutes.
Oven: Preheat oven to 350 degrees F. Remove plastic wrap and wrap the burrito in aluminium foil. Heat for 30 minutes until cooked through.
Serve with sour cream, salsa and shredded lettuce.
![]() |
| Dinner we had that night: I also added leftover rice, salsa and shredded lettuce. |
Source: Adapted from Money Saving Mom
12.31.2014
Top 10 Posts of 2014
Exactly a year ago, 2013 ended off with a bang. Literally.
My husband and I were celebrating New Years at my Mother-In-Law's when the cork from a sparkling apple juice popped off unexpectedly. The cork hit a light bulb (in the ceiling fan), which shattered into a million pieces all over the living room. All of this happened minutes before the New Year's countdown.
We spent the last 5 minutes of 2013 frantically cleaning, vacuuming and sweeping the living room before counting down to 2014. It was not a relaxed way to celebrate the start the year.
2014 felt equally frantic as it was an eventful year for us (both good and bad). Through all the craziness, it made me realize the important things in life are being healthy and spending quality time with family.
Needless to say, I am hoping for a more relaxed way to end 2014 and hoping 2015 will be a healthier and happier year.
On behalf of my husband, myself and my little man, we would like to make a toast. We wish you and your loved ones a healthy and happy year ahead. Cheers!
And what better way to start 2015 than to try out the top 10 most popular posts on Frugal Allergy Mom.
Please come back and visit in 2015 for more nut-free recipes, frugal tips, allergy management and child development posts.
My husband and I were celebrating New Years at my Mother-In-Law's when the cork from a sparkling apple juice popped off unexpectedly. The cork hit a light bulb (in the ceiling fan), which shattered into a million pieces all over the living room. All of this happened minutes before the New Year's countdown.
We spent the last 5 minutes of 2013 frantically cleaning, vacuuming and sweeping the living room before counting down to 2014. It was not a relaxed way to celebrate the start the year.
2014 felt equally frantic as it was an eventful year for us (both good and bad). Through all the craziness, it made me realize the important things in life are being healthy and spending quality time with family.
Needless to say, I am hoping for a more relaxed way to end 2014 and hoping 2015 will be a healthier and happier year.
On behalf of my husband, myself and my little man, we would like to make a toast. We wish you and your loved ones a healthy and happy year ahead. Cheers!
And what better way to start 2015 than to try out the top 10 most popular posts on Frugal Allergy Mom.
![]() |
| Need caffeine? Try this recipe for delicious Vietnamese iced coffee. |
![]() |
| Top waffles, pancakes, ice cream, turkey and chicken with this versatile Cranberry Blueberry Sauce. |
![]() |
| Reuse wrapping paper to make this festive 3D Christmas Tree. |
![]() |
| From start to finish, this pizza only takes 35 minutes to make. |
![]() |
| A hearty soup to warm you up on a cold winter day. |
![]() |
| A quick 20 minute cookie recipe to make when guests pop over unexpectedly! |
![]() |
| An easy dessert to impress your guests. |
![]() |
| Guaranteed perfect prime rib every time. |
![]() |
| Rich and decadent hot chocolate that will curb your chocolate craving. Also great after a day out in the snow. |
![]() |
| Fresh homemade bread loaf ready in over an hour! |
Please come back and visit in 2015 for more nut-free recipes, frugal tips, allergy management and child development posts.
Happy New Year!
Labels:
Appetizers,
Beef,
Bread,
Breakfast,
Brunch,
Cast Iron,
Chicken,
Crafts,
Dessert,
DIY,
Drinks,
Easy,
Eggs,
Entrees,
F.A.M. Recipes,
Recipe
12.06.2014
20 Minute Meatball Stroganoff
There is no denying that I love quick dinners that require little effort. That is why I stock my freezer with frozen meatballs. I use frozen meatballs in spaghetti and meatballs, meatball sliders, as an appetizer or in my version of a meatball stroganoff.
My meatball stroganoff is not an authentic beef stroganoff recipe. But it is hearty, delicious and ready in under 20 minutes.
So on a night when you are ready to call for takeout, give this recipe a try. My husband and little man ate this up in no time!
Ingredients
20 meatballs (roughly 5 meatballs per person)
2 tbsp vegetable oil
2 cloves garlic, minced
8 mushrooms, sliced
3 cans cream of mushroom soup
1/4 cup frozen peas
340 g egg noodles, broad noodles or bow tie pasta (you can also serve with mashed potatoes or rice)
Directions
1. Microwave the meatballs (if frozen) according to package directions. You can serve the meatball whole or quarter it if you have little ones.
2. In a large pot, bring a pot of water to a boil. Add egg noodles and cook according to package directions. Drain; do not rinse.
3. Heat the vegetable oil over medium heat in another large pot and saute the garlic until it is fragrant (30 seconds to 1 minute).
4. Add the mushrooms and cook until the mushrooms are soft. Remove and set aside.
5. Saute the meatballs for a few minutes until the meatballs are lightly seared.
6. Pour in the cream of mushroom soup, frozen peas and sauteed mushrooms. Stir and simmer on medium for 10 minutes.
7. Serve over egg noodles or carb of your choice.
Source: Frugal Allergy Mom
My meatball stroganoff is not an authentic beef stroganoff recipe. But it is hearty, delicious and ready in under 20 minutes.
So on a night when you are ready to call for takeout, give this recipe a try. My husband and little man ate this up in no time!
Ingredients
20 meatballs (roughly 5 meatballs per person)
2 tbsp vegetable oil
2 cloves garlic, minced
8 mushrooms, sliced
3 cans cream of mushroom soup
1/4 cup frozen peas
340 g egg noodles, broad noodles or bow tie pasta (you can also serve with mashed potatoes or rice)
Directions
1. Microwave the meatballs (if frozen) according to package directions. You can serve the meatball whole or quarter it if you have little ones.
2. In a large pot, bring a pot of water to a boil. Add egg noodles and cook according to package directions. Drain; do not rinse.
3. Heat the vegetable oil over medium heat in another large pot and saute the garlic until it is fragrant (30 seconds to 1 minute).
4. Add the mushrooms and cook until the mushrooms are soft. Remove and set aside.
5. Saute the meatballs for a few minutes until the meatballs are lightly seared.
6. Pour in the cream of mushroom soup, frozen peas and sauteed mushrooms. Stir and simmer on medium for 10 minutes.
7. Serve over egg noodles or carb of your choice.
Source: Frugal Allergy Mom
10.31.2014
Perfect Prime Rib
![]() |
| Easter 2014; the first time I made prime rib! |
Prime rib is one of those things we almost never purchase. This is the second time I bought prime rib and I try to buy it only when it goes on sale. In Vancouver, $5.99/lb is a good deal for prime rib. I purchased a 5.412 lb of prime rib for $32.42. As a member of PC Plus, I received 6400 points (200 points for every $1 spent on fresh beef) which translates to $6.40 off. In addition, I received 4000 points off for spending over $30. After all the discounts, my prime rib costs $22.02 which worked out to be $4.07/lb and can easily serve 15 people (10 oz servings). Not too bad considering a 10 oz (300 g) prime rib costs $25 at my local Keg Steakhouse.
When you are forking over that much money for a prime rib roast, you want to make sure you buy the best available. I prefer to have a good marbling throughout the roast which yields in a tender and flavorful meat.
![]() |
| Nice marbling of fat throughout. |
Quick Tips
- Keep prime rib roast in the bottom vegetable drawer to prevent the juices from contaminating other foods.
- Take the prime rib roast from the refrigerator 20 to 30 minutes before as this helps to reduce the chill in the roast so the inside will cook evenly.
- Allow the prime rib rest for 10 to 15 minutes after cooking to ensure the roast is moist, tender and juicy.
![]() |
| Thanksgiving 2014; beautiful medium rare prime rib with roasted vegetables. |
Ingredients
5 to 6 lb prime rib
10 cloves garlic, minced
3 tbsp olive oil
3 tsp freshly ground black pepper
2 tsp dried thyme
Directions
1. Take the prime rib out of the refrigerator 20 to 30 minutes before you start cooking.
![]() |
| If your house tends to be colder, take the roast out up to 45 minutes earlier. |
2. Preheat oven to 450 degrees F and adjust the oven rack to lower-middle position.
3. In a small bowl, mix garlic, olive oil, black pepper and dried thyme together.
![]() |
| A quick rub for the prime rib. |
4. Place the prime rib in a roasting pan and rub the mixture all over.
![]() |
| Give the prime rib a nice massage. |
5. Roast in the oven for 30 minutes at 450 degrees F. Decrease the temperature to 325 degrees F and roast for 13 to 15 minutes per pound. My roast took about 72 minutes to cook for a medium to medium rare prime rib. (Note that the roast will continue to cook after you take it out of the oven. If you like medium to medium rare, insert a meat thermometer to get an accurate reading. If you have guests who favor a more well-cooked prime rib, the end pieces are medium-well and you can always lightly pan fry it to fully cook the meat. This is what we did for our little man.)
6. Take the pan out of the oven and tent the prime rib loosely with foil. Allow it to rest for 10 to 15 minutes before carving and slicing.
![]() | ||
| Medium-rare prime rib. My little luxury in my frugal life. |
Subscribe to:
Posts (Atom)