This is the salad that I have been eating all summer long. Well, ever since I discovered it at my Sister-In-Law's house back in June.
My Sister-In-Law always serves at least two amazing salads at her dinner parties. The list of salads on her menu rotate as she experiments with different recipes. This leads me to constantly asking her for recipes and helping myself to countless servings shamelessly as a dinner guest. My worst offense has been with this particular salad, where I was responsible for eating most if not all of it. If I recall correctly, other people wanted a second serving as well. Well, first come first served.
Since I couldn't get enough of this salad at my Sister-In-Law's, I had to make it for myself many times to satiate those pesky cravings.
This salad taste best when you use fresh, in season corn and tomatoes. Serve this salad as a side or a main entree, as it's guaranteed to please even the fussiest eaters. I hope your guests will be a little more considerate than I was at sharing.
Ingredients
2 corn off the cob (check out how to cook corn in 3 minutes) or 12 oz (360 ml) can of peaches and cream corn, rinsed and drained
3 vine-ripened tomatoes, diced into small pieces
12 oz (360 ml) can black beans, rinsed and drained
1/4 cup finely minced red onion
1/8 cup chopped cilantro (optional)
1 large avocado, peeled, pitted and chopped into bite sized pieces
Dressing
1/4 cup fresh lime juice
2 tbsp vegetable oil
1 tsp ground cumin*
1/2 tsp sea salt
1/2 tsp freshly ground pepper
Directions
1. Combine corn kernels, tomatoes, black beans, red onion and cilantro in a bowl.
2. Mix the ingredients for the dressing in a small bowl. Pour the dressing into the vegetables and mix. Allow the salad to marinate for at least 30 minutes to 1 hour in the refrigerator for best flavor. Stir in the avocado right before serving.
*For those with peanut and/or tree nut allergies, Clubhouse/McCormick sells spices free of peanuts and tree nuts. This may change without notice, please check
with company for up to date information and always read all labels carefully before consuming.
Source: Lola via Frugal Allergy Mom
Frugal Mom To a Nut Allergic Child. Recipes, frugal finds, child development and food allergy management. Posts weekly.
Showing posts with label Family. Show all posts
11.07.2015
9.19.2015
Chinese Fresh Fruit Cake
Recipe updated April 28, 2024: Since publishing this recipe almost 10 years ago, I have made numerous modifications to improve the recipe.
We all want to feel like we belong. Nothing can be more true than my longing for others to include my nut-allergic little man at social gatherings involving food. In the food allergy world, we keep hearing, "exclude the food, not the child". While I wholeheartedly agree that we should exclude the food, the practicality of this in a society centered around food often makes this task impossible. Since food is part of the social norm and how we bond, I often wondered why don't we adapt the food or find an allergy friendly alternative so a food allergy child can be included?
For the past year or so, Chinese fresh fruit cake seems to be the cake of choice. No, this is not the fruit cake that gets passed around at Christmas like a hot potato. This cake is light and slightly sweet, decorated with slices of fresh fruit and frosted with fresh whipping cream sandwiched between two layers of light and fluffy sponge cake. This is the good stuff. And it generally costs a pretty penny, averaging $30-$40 for a 7" cake at a reputable Chinese bakery in Vancouver.
At these events, while everyone chows down on the cake, my little man always looks at me with a glimmer of hope. I would whisper to him that it may contain nuts (as certain bakeries decorate their fresh fruit cake with sliced almonds). At 2 years of age, he is learning to accept that he cannot eat certain foods. As usual, I always have a safe snack available and he is happy that I had thought to include him. I have noticed that as he grows older, he notices everyone happily sharing the same treat while he is given something different. I feel the exclusion too when my little man is excluded from these events. Sometimes, I would eat the same safe snack as my little man to show him a little solidarity.
Hence my need to learn to make this darned fresh fruit cake.
To be honest, I have always been intimidated by how labour intensive it is to make a Chinese fresh fruit cake. However, after I made it three times, I realized that making this cake is no different than any other cake I have made. In fact, I have found that this cake is quite easy, provided that you carefully read all the instructions and follow it.
My Adaptations
Most of all, I want to thank Mika at 350 Degree Oven for posting and sharing this wonderful recipe. Armed with Mika's recipe, my little man was finally able to have a slice of Chinese fresh fruit cake, just like everyone else.
Ingredients
6 large eggs, separated
12 tablespoon white sugar, divided
1/2 tsp table salt
1 tsp clear vanilla extract (regular vanilla extract will work as well)
1/2 cup cold water
1/3 cup canola oil
1 cup cake flour (do not substitute in AP flour)
1 tsp baking powder
1/4 tsp cream of tartar
475 ml (~1 pint) heavy whipping cream
3 tbsp white sugar
Fresh fruit to decorate: strawberries, raspberries, blueberries, blackberries, kiwi, peach/necterine, cantaloupe or honeydew (you generally want to use fruits with a soft flesh). Please do not use canned, frozen or dried fruit in this cake.
1 cup chopped fresh fruit (I usually like to use the same fruit as I used to decorate the cake. This is the perfect place to use those end pieces not suitable for decoration).
Directions
1. Separate the egg yolk from the egg white; be careful not to contaminate the egg white with any egg yolk otherwise the egg whites will not whip properly. I like using my hands to separate the egg yolk from the egg white. I always use three bowls: one for the egg yolks, one for the egg whites and one bowl for the egg that I just cracked to check to make sure the egg white in the bowl is not contaminated. This way, if you have some egg yolk in the egg whites, you can easily discard the contaminated bowl without having to discard your whole batch.
2. To the bowl of egg yolks, add 6 tablespoons of sugar, 1/2 tsp of salt, 1 tsp of clear vanilla extract.
3. Using a hand blender, beat the egg yolks until the mixture is smooth.
4. Add 1/2 cup cold water and 1/3 cup canola oil to the egg yolk mixture. Beat until smooth.
5. In a bowl, sift 1 cup of cake flour and 1 teaspoon baking powder. Do NOT add cream of tartar!
6. Pour the sifted flour mixture into the egg yolk batter and beat until just combined; do not over mix. I personally prefer to beat the mixture until only a few traces of flour remain and folding the rest of the batter by hand with a spatula.
7. Detach your whisks and wash it thoroughly in warm soapy water. Dry the whisks thoroughly with a paper towel to remove all traces of oil and fat.
8. Preheat the oven to 350 degrees.
9. With your clean and dry whisks, beat the egg whites until it is foamy. Then add 6 tablespoons sugar and 1/4 tsp cream of tartar until the egg whites are stiff and should hold if you try to tip the bowl. This can take a while, up to 3 to 5 minutes in some cases. Be patient.
10. Using a flat spatula, stir in 1/3 of the egg whites into the egg yolk batter.
11. Then, gently fold (using figure 8 motions) in another 1/3 of the egg whites.
12. Lastly, gently fold in the remaining egg whites with your spatula. Do not over mix. It is okay if your cake batter has streaks of egg white throughout. Over mixing will result in a denser cake which is the opposite of what we want to achieve.
13. Line your cake pans with parchment paper (do not use wax paper). Divide the batter evenly between 2 cake pans. I used two 9" round cake pans but 8" cake pans work just as well (you will need to adjust the baking time).
14. Bake for 25 to 35 minutes, depending on your oven. In my oven, it took 30 minutes to bake two 9" cake pans. I have also tested switching the cake pans half way through and have found that leaving the cakes alone to bake uninterrupted worked the best. Bake until the sides of the cake look like they are pulling away from the cake pan. Once the cakes look golden brown and the edges look like it is pulling away, turn off the oven and leave it in the oven for another 5 minutes.
15. Allow the cakes to cool upside down on a cooling rack. This step is important as otherwise the cake will deflate if allowed to cool upright.
16. Once the cake has cooled completely, run a knife along the edge of the cake pan to loosen it. At this point, you can either use it right away or store it in the fridge in a tight lidded container lined with parchment paper for up to a day. If you choose the latter option, make sure to take the cake out of the refrigerator at least 30 minutes before you frost the cake.
17. In a large bowl, pour in the whipping cream. Beat until the whipping cream forms soft peaks. Add in 3 tablespoons of sugar and beat until the whipping cream is just about to form stiff peaks.
18. In a small bowl, mix in 1 cup of whipped cream with 1 cup of fresh fruit.
19. Place the cake right side up on a cake board or a cutting board covered with aluminum foil. Using an offset spatula, spread a thin layer of whipped cream on the top. Then spread the fresh fruit and whipped cream mixture evenly over the cake.
20. Place the second cake upside down on top of the fresh fruit mixture. Frost the top and sides with whipped cream.
21. Place the whole cake in the fridge uncovered to allow the whipped cream to firm up for at least 15 to 30 minutes.
22. Meanwhile, slice and prepare the fresh fruit. Place the sliced fruit on a clean and dry paper towel to absorb any excess moisture. I should note that you should only use fresh fruit, not canned, not frozen, and certainly not dried fruit. The best thing to do is to use fruits in season as they are the most economical, and taste the best.
23. Take the cake out of the fridge and smooth the whipped cream with an offset spatula. Decorate with sliced fruit. At this point, you can either chill the cake for up to 4 hours (cover with a loose lid to prevent the cake absorbing other smells from your fridge) or serve the cake right away for immediate consumption. Now it's time for me to go work off all the calories from eating three cakes within one week!!
Source: Adapted from The 350 Degree Oven
For the past year or so, Chinese fresh fruit cake seems to be the cake of choice. No, this is not the fruit cake that gets passed around at Christmas like a hot potato. This cake is light and slightly sweet, decorated with slices of fresh fruit and frosted with fresh whipping cream sandwiched between two layers of light and fluffy sponge cake. This is the good stuff. And it generally costs a pretty penny, averaging $30-$40 for a 7" cake at a reputable Chinese bakery in Vancouver.
At these events, while everyone chows down on the cake, my little man always looks at me with a glimmer of hope. I would whisper to him that it may contain nuts (as certain bakeries decorate their fresh fruit cake with sliced almonds). At 2 years of age, he is learning to accept that he cannot eat certain foods. As usual, I always have a safe snack available and he is happy that I had thought to include him. I have noticed that as he grows older, he notices everyone happily sharing the same treat while he is given something different. I feel the exclusion too when my little man is excluded from these events. Sometimes, I would eat the same safe snack as my little man to show him a little solidarity.
Hence my need to learn to make this darned fresh fruit cake.
To be honest, I have always been intimidated by how labour intensive it is to make a Chinese fresh fruit cake. However, after I made it three times, I realized that making this cake is no different than any other cake I have made. In fact, I have found that this cake is quite easy, provided that you carefully read all the instructions and follow it.
My Adaptations
- I found the original recipe to be quite sweet and halved the sugar in the whipping cream recipe.
- I also did not use almonds in my finished cake as my little man has a nut allergy. In lieu of almonds, you can use dried coconut flakes or shaved chocolate to decorate the sides. Please make sure to read the labels to avoid cross contamination. I opted to leave the sides undecorated to let the flavors of fresh fruit shine through.
- Having made this cake at least 60 times since publishing in 2015, I now use parchment paper to line my baking pans, and also add the sugar later on in the process.
Most of all, I want to thank Mika at 350 Degree Oven for posting and sharing this wonderful recipe. Armed with Mika's recipe, my little man was finally able to have a slice of Chinese fresh fruit cake, just like everyone else.
Ingredients
6 large eggs, separated
12 tablespoon white sugar, divided
1/2 tsp table salt
1 tsp clear vanilla extract (regular vanilla extract will work as well)
1/2 cup cold water
1/3 cup canola oil
1 cup cake flour (do not substitute in AP flour)
1 tsp baking powder
1/4 tsp cream of tartar
475 ml (~1 pint) heavy whipping cream
3 tbsp white sugar
Fresh fruit to decorate: strawberries, raspberries, blueberries, blackberries, kiwi, peach/necterine, cantaloupe or honeydew (you generally want to use fruits with a soft flesh). Please do not use canned, frozen or dried fruit in this cake.
1 cup chopped fresh fruit (I usually like to use the same fruit as I used to decorate the cake. This is the perfect place to use those end pieces not suitable for decoration).
Directions
1. Separate the egg yolk from the egg white; be careful not to contaminate the egg white with any egg yolk otherwise the egg whites will not whip properly. I like using my hands to separate the egg yolk from the egg white. I always use three bowls: one for the egg yolks, one for the egg whites and one bowl for the egg that I just cracked to check to make sure the egg white in the bowl is not contaminated. This way, if you have some egg yolk in the egg whites, you can easily discard the contaminated bowl without having to discard your whole batch.
2. To the bowl of egg yolks, add 6 tablespoons of sugar, 1/2 tsp of salt, 1 tsp of clear vanilla extract.
3. Using a hand blender, beat the egg yolks until the mixture is smooth.
4. Add 1/2 cup cold water and 1/3 cup canola oil to the egg yolk mixture. Beat until smooth.
5. In a bowl, sift 1 cup of cake flour and 1 teaspoon baking powder. Do NOT add cream of tartar!
6. Pour the sifted flour mixture into the egg yolk batter and beat until just combined; do not over mix. I personally prefer to beat the mixture until only a few traces of flour remain and folding the rest of the batter by hand with a spatula.
7. Detach your whisks and wash it thoroughly in warm soapy water. Dry the whisks thoroughly with a paper towel to remove all traces of oil and fat.
8. Preheat the oven to 350 degrees.
9. With your clean and dry whisks, beat the egg whites until it is foamy. Then add 6 tablespoons sugar and 1/4 tsp cream of tartar until the egg whites are stiff and should hold if you try to tip the bowl. This can take a while, up to 3 to 5 minutes in some cases. Be patient.
10. Using a flat spatula, stir in 1/3 of the egg whites into the egg yolk batter.
11. Then, gently fold (using figure 8 motions) in another 1/3 of the egg whites.
12. Lastly, gently fold in the remaining egg whites with your spatula. Do not over mix. It is okay if your cake batter has streaks of egg white throughout. Over mixing will result in a denser cake which is the opposite of what we want to achieve.
13. Line your cake pans with parchment paper (do not use wax paper). Divide the batter evenly between 2 cake pans. I used two 9" round cake pans but 8" cake pans work just as well (you will need to adjust the baking time).
14. Bake for 25 to 35 minutes, depending on your oven. In my oven, it took 30 minutes to bake two 9" cake pans. I have also tested switching the cake pans half way through and have found that leaving the cakes alone to bake uninterrupted worked the best. Bake until the sides of the cake look like they are pulling away from the cake pan. Once the cakes look golden brown and the edges look like it is pulling away, turn off the oven and leave it in the oven for another 5 minutes.
15. Allow the cakes to cool upside down on a cooling rack. This step is important as otherwise the cake will deflate if allowed to cool upright.
16. Once the cake has cooled completely, run a knife along the edge of the cake pan to loosen it. At this point, you can either use it right away or store it in the fridge in a tight lidded container lined with parchment paper for up to a day. If you choose the latter option, make sure to take the cake out of the refrigerator at least 30 minutes before you frost the cake.
17. In a large bowl, pour in the whipping cream. Beat until the whipping cream forms soft peaks. Add in 3 tablespoons of sugar and beat until the whipping cream is just about to form stiff peaks.
18. In a small bowl, mix in 1 cup of whipped cream with 1 cup of fresh fruit.
19. Place the cake right side up on a cake board or a cutting board covered with aluminum foil. Using an offset spatula, spread a thin layer of whipped cream on the top. Then spread the fresh fruit and whipped cream mixture evenly over the cake.
20. Place the second cake upside down on top of the fresh fruit mixture. Frost the top and sides with whipped cream.
21. Place the whole cake in the fridge uncovered to allow the whipped cream to firm up for at least 15 to 30 minutes.
22. Meanwhile, slice and prepare the fresh fruit. Place the sliced fruit on a clean and dry paper towel to absorb any excess moisture. I should note that you should only use fresh fruit, not canned, not frozen, and certainly not dried fruit. The best thing to do is to use fruits in season as they are the most economical, and taste the best.
23. Take the cake out of the fridge and smooth the whipped cream with an offset spatula. Decorate with sliced fruit. At this point, you can either chill the cake for up to 4 hours (cover with a loose lid to prevent the cake absorbing other smells from your fridge) or serve the cake right away for immediate consumption. Now it's time for me to go work off all the calories from eating three cakes within one week!!
Reader Survey: Leave me a comment below and let me know a little about you and what type of content interests you. Or head over to this 1 minute survey and let me know what type of content you want to see featured in the future. https://bit.ly/FAMReaderSurvey
4.11.2015
Free Monthly Kids Workshop at Home Depot (Canada & US)
At an early age, most toddlers recognize the corporate logos of McDonalds, Disney, Apple, Lego, Walmart and Starbucks. For my niece and nephew, they recognize the iconic orange logo of Home Depot long before they recognized McDonald's. (No joke!)
They recognize Home Depot's logo mostly because they have attended the free monthly Kids Workshop offered by the home improvement giant since they were toddlers. That and the fact their dad (my brother-in-law) is a regular customer.
When my brother-in-law heard that we were expecting, he reminded us to take our little one to the monthly Home Depot Kids Workshop. That made my husband (who is also a Home Depot regular) very happy.
This morning, we attended our very first Home Depot's Kids Workshop. Today, the workshop offered kids a chance to build a chalkboard planter stand.
The workshop was a great experience. Every child is provided with an authentic Home Depot apron, a commemorative pin and a building kit, which includes the instructions and all materials needed. Home Depot also provides all the tools to assemble and decorate the planter at designated tables, including hammers, paints, glue, paper towels and guidance (if the parents needed some help). Most of the items created from these workshops are practical items that can be used around the home and it is a great way to teach kids some useful life skills.
The workshop is geared towards 4 to 12 year olds, but we saw quite a few toddlers working away with their parents. Our little man is quite mature for his age, listens well and knows (for the most part) not to put small things (like nails) in his mouth. My husband enlisted the little man to "help" build and paint his planter.
After the planter has been built and painted, Home Depot gave each child a certificate of achievement. It was the perfect way to spend a bit of our morning at our little man's new favorite store. I have a strong feeling he will recognize the iconic orange signs before long!
TIPS
* Please call your local Home Depot before attending the workshop. While supplies last.
They recognize Home Depot's logo mostly because they have attended the free monthly Kids Workshop offered by the home improvement giant since they were toddlers. That and the fact their dad (my brother-in-law) is a regular customer.
When my brother-in-law heard that we were expecting, he reminded us to take our little one to the monthly Home Depot Kids Workshop. That made my husband (who is also a Home Depot regular) very happy.
This morning, we attended our very first Home Depot's Kids Workshop. Today, the workshop offered kids a chance to build a chalkboard planter stand.
![]() |
| This workshop was particularly popular! |
The workshop was a great experience. Every child is provided with an authentic Home Depot apron, a commemorative pin and a building kit, which includes the instructions and all materials needed. Home Depot also provides all the tools to assemble and decorate the planter at designated tables, including hammers, paints, glue, paper towels and guidance (if the parents needed some help). Most of the items created from these workshops are practical items that can be used around the home and it is a great way to teach kids some useful life skills.
![]() |
| Ready to learn! |
The workshop is geared towards 4 to 12 year olds, but we saw quite a few toddlers working away with their parents. Our little man is quite mature for his age, listens well and knows (for the most part) not to put small things (like nails) in his mouth. My husband enlisted the little man to "help" build and paint his planter.
![]() |
| Hammering away; just like his Little Tikes work bench at home. |
After the planter has been built and painted, Home Depot gave each child a certificate of achievement. It was the perfect way to spend a bit of our morning at our little man's new favorite store. I have a strong feeling he will recognize the iconic orange signs before long!
![]() |
| The finished product! |
TIPS
- Go early to avoid crowds and avoid disappointment (as they can run out of kits). According to the friendly sales associate I spoke with, certain workshops are extremely popular: May (Mother's Day), December (Christmas).
- Be courteous to staff and other participants. Please do not hog more resources than what you need.
- Stay safe. Watch younger children as there are lots of small parts.
- Say thanks to the friendly staff who run these workshops!
| Home Depot Canada | Home Depot United States | |||
|---|---|---|---|---|
| When | Second Saturday of each month 10am - 12pm* |
First Saturday of each month 9am - 12pm* |
||
| RSVP | Register online | Register online | ||
| Cost | Free | Free | ||
| Ages | 4 to 12 years old | 5 to 12 years old |
* Please call your local Home Depot before attending the workshop. While supplies last.
Reader Survey: Leave me a comment below and let me know a little about you and what type of content interests you. Or head over to this 1 minute survey and let me know what type of content you want to see featured in the future. https://bit.ly/FAMReaderSurvey
4.09.2015
Free Swimming at Greater Vancouver Recreation Centres
Growing up in an immigrant family, we were all about free or inexpensive. My family knew how to stretch a penny, let alone a dollar. Free was the golden word, especially when it came to family entertainment.
If you live in Greater Vancouver, you will be happy to know that Westminster Savings sponsors free public swims at select recreation centres (see the list below). In addition, the City of Vancouver sponsors a free public swim twice a week at Britannia Pool in East Vancouver. Until April 26, 2015, Britannia offers free swimming between 3pm to 4:55pm every Tuesday and Thursday.
Yes, you read that correctly. Free swimming!
Last Sunday, my husband suggested checking out the free public swim at Eileen Dailly Pool. Unfortunately, the free swim conflicted with the little man's need to nap after having too much fun at Burnaby Central Railway (read about our visit here).
From the viewing area, the pool looked busy but not overly packed. We will have to try again as this looks like it would be a great family activity especially if you have young children.
UPDATE: August 2, 2015
We went to the free swim hosted by Westminster Savings on Sunday, August 2nd (aka the first Sunday of the month). Since the free swim was at 12:30, we arrived 15 minutes prior and lined up at Eileen Dailly. We could tell this was a popular event by the crowds who were scattered throughout the viewing area.
Here are some tips for those of you wanting to visit:
**Please note that the free swims are subject to change. Please call before you go and arrive early.**
Please let me know via the comments form below if there are more recreation centres in Greater Vancouver that offer free swims! :)
Source: Westminster Savings and City of Vancouver
If you live in Greater Vancouver, you will be happy to know that Westminster Savings sponsors free public swims at select recreation centres (see the list below). In addition, the City of Vancouver sponsors a free public swim twice a week at Britannia Pool in East Vancouver. Until April 26, 2015, Britannia offers free swimming between 3pm to 4:55pm every Tuesday and Thursday.
Yes, you read that correctly. Free swimming!
Last Sunday, my husband suggested checking out the free public swim at Eileen Dailly Pool. Unfortunately, the free swim conflicted with the little man's need to nap after having too much fun at Burnaby Central Railway (read about our visit here).
From the viewing area, the pool looked busy but not overly packed. We will have to try again as this looks like it would be a great family activity especially if you have young children.
UPDATE: August 2, 2015
We went to the free swim hosted by Westminster Savings on Sunday, August 2nd (aka the first Sunday of the month). Since the free swim was at 12:30, we arrived 15 minutes prior and lined up at Eileen Dailly. We could tell this was a popular event by the crowds who were scattered throughout the viewing area.
Here are some tips for those of you wanting to visit:
- Arrive early (at least 15 minutes).
- Bring a quarter to rent a locker for the locker room. There are a limited number of large lockers for rent; great for those with little ones.
- Supervise your children. With the number of people who attend these free swims, you want to ensure their safety and the safety of others.
- Be considerate of others. The showers in each of the washrooms are for you to quickly rinse off; not to spend 15 minutes lathering up. So please, be quick with it and do your full hair conditioning at home.
- Lastly, thank Westminster Savings for their generosity! You can follow Westminster Savings on Facebook, Twitter, LinkedIn or Instagram. Even better, go thank them in person at any one of their fourteen branches in the lower mainland.
**Please note that the free swims are subject to change. Please call before you go and arrive early.**
Free Swimming in Greater Vancouver
| Location | Start | End | Location | Address | Phone | When |
|---|---|---|---|---|---|---|
| Burnaby | 12:30pm | 2:30pm | Eileen Dailly Leisure Pool | 240 Willingdon Ave, Burnaby | 604-298-7946 | First Sunday of every month |
| Burnaby | 7:00pm | 9:00pm | Bonsor Recreation Complex | 6550 Bonsor Avenue, Burnaby | 604-297-4597 | First Wednesday of every month |
| Coquitlam | 7:00pm | 9:00pm | Poirier Sports & Leisure Complex | 633 Poirier Street, Coquitlam | 604-927-6027 | First Sunday of every month |
| Coquitlam | 7:00pm | 9:00pm | City Centre Aquatic Complex | 1210 Pinetree Way, Coquitlam | 604-927-6999 | Third Friday of every month |
| Langley | 2:00pm | 4:00pm | WC Blair Recreation Centre | 22200 Fraser Highway, Langley | 604-533-6170 | Second Sunday of every month |
| Maple Ridge/Pitt Meadows | 2:00pm | 3:30pm | Maple Ridge Leisure Centre | 11925 Haney Place, Maple Ridge | 604-467-7322 | Last Saturday of each month |
| New Westminster | 2:30pm | 4:30pm | Canada Games Pool | 65 East 6th Avenue,New Westminster | 604-526-4281 | First Wednesday of every month |
| Port Coquitlam | 1:00pm | 3:00pm | Hyde Creek Recreation Centre | 1379 Laurier Ave, Port Coquitlam | 604-927-7946 | First Sunday of every month |
| Surrey | 2:00pm | 5:00pm | North Surrey Recreation Centre | 10275 City Parkway, Surrey | 604-502-6300 | Last Saturday of each month |
| Surrey | 6:00pm | 8:00pm | Newton Recreation Centre | 13730 72 Avenue, Surrey | 604-501-5540 | Second Sunday of each month |
| Surrey | 3:00pm | 5:00pm | Surrey Sport & Leisure Complex | 16555 Fraser Hwy, Surrey | 604-501-5881 | Third Sunday of each month |
| Surrey | 1:00pm | 4:00pm | South Surrey Indoor Pool | 14655 17 Avenue, Surrey | 604-502-6220 | First Saturday of each month |
| Vancouver | 3:00pm | 4:55pm | Britannia Pool | 1661 Napier St | 604-718-5800 | Tuesdays and Thursdays* until April 26, 2015 |
Please let me know via the comments form below if there are more recreation centres in Greater Vancouver that offer free swims! :)
Source: Westminster Savings and City of Vancouver
2.24.2015
In Memory
My late grandmother loved pink cherry blossoms.
Today would have been my late grandmother's 85th birthday. As the matriarch of our family, she played an integral role in my upbringing and I worshiped her. Every year since she passed away seven years ago, the two days that are the hardest for me are her birthday (February 24th) and the day she passed away (October 2nd). Life moves on for most people, but for me, these two days are one of remembrance.
You see, her absence is a constant reminder that we should cherish those we love. There is a saying that you should give those you love your "presence" and not "presents". This is very true of my relationship with my late grandmother as she always made time for me, no matter how busy she is. When my late grandmother was alive, I would call her to ask for advice on everything and she would always call me to chat. My late grandmother was a religious woman, and she give up her Friday night worship if I went home to visit on a weekend. To her, spending time with someone is the most important thing in the world.
So on what would have been her 85th birthday, I am taking some time from my day to remember the woman who loved me and raised me. I miss you, I love you and I will always remember you, grandma.
12.25.2014
Merry Christmas!
![]() |
| Nut-free cookies for Santa (It's Dare Maple Leaf Cream, eh?) |
For Christians around the world, Christmas is a time to celebrate the birth of Christ. For those who celebrate Christmas, it is also a time to spend with family and gorge on a never-ending supply delicious food. This year marks the first nut-free Christmas for our family since the little man was diagnosed with peanut and almond allergies in March.
While I cannot say that this year has been without its share of difficulties and challenges, I feel blessed by the support we have received from family, friends, fellow food allergy bloggers and the food allergy community. As a result of everyone's support, we learned the importance of carrying and administering epinephrine, allergen avoidance at social gatherings, the need to always read labels and educate others on the seriousness of food allergies.
On the other hand, there have been many good things that have resulted from us being a part of the food allergy community. I have met some incredible and supportive people (through online and in person), made a conscious decision to stay at home to raise my little man (and watch him grow before my eyes), started this blog (meeting some amazing food allergy bloggers in the process), and learned that I am a good cook (from what I'm told). We are eating healthier (most times if you don't count my love of butter and cheese), saving money (from not eating out at restaurants) and supporting one another through challenging times (my husband rocks at this!). Moreover, we learned that while food plays an important role in most of our social gatherings, it does not have to be the end all be all for gatherings to be enjoyable.
So, on this special day, I want to count my blessings for what I have and give thanks: to God, to my wonderful husband, my amazing little man, our families, old and new friends and amazing companies who support the food allergy community. Merry Christmas everyone!
![]() |
| Stanley Park in Vancouver is our oasis when we need a break from everything. |
12.24.2014
DIY Paper Christmas Tree Ornament
I love quick and easy Do-It-Yourself projects. This Pinterest project for an origami folded Christmas tree takes less than 10 minutes. It is an easy project for kids, adds a festive touch to your Christmas dinner table and best of all, you can reuse wrapping paper (destined for the trash) from all those Christmas gifts.
If you make this Christmas tree, please send me a tweet @frugalnutfree and let me know how it turned out!
What You Will Need
Wrapping paper, origami paper or printer paper (preferably colorful and thinner paper stock)
Scissors
Video Instructions
I made a video showing how to make a paper Christmas tree in case the step by step instructions below are unclear. This is my first video, so you will have to forgive any little issues. :)
Step By Step Instructions
1. Fold a square piece of paper diagonally. Unfold the paper.
2. Fold the paper diagonally so the creases form an X. Unfold the paper.
3. Fold the paper in half so it is a rectangle.
4. Fold the paper once again so it is a square.
5. Unfold the paper and flip it so the inside of the paper is facing up.
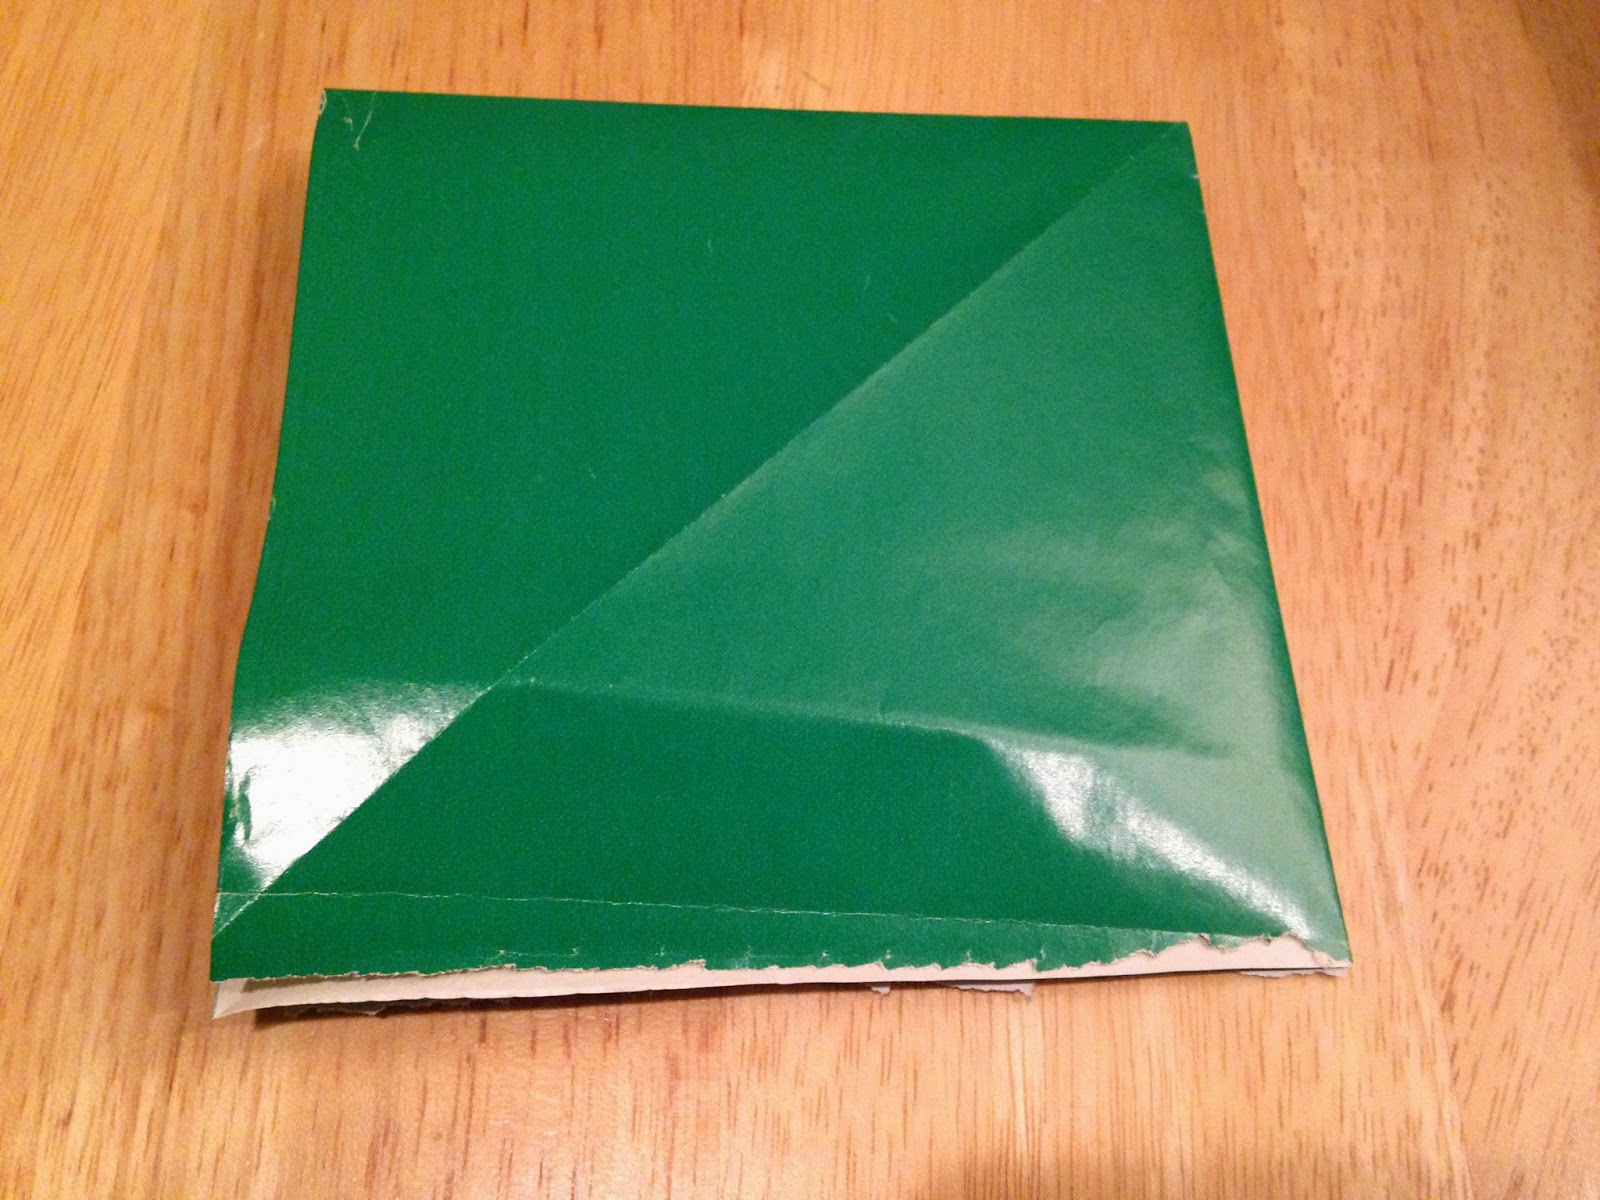
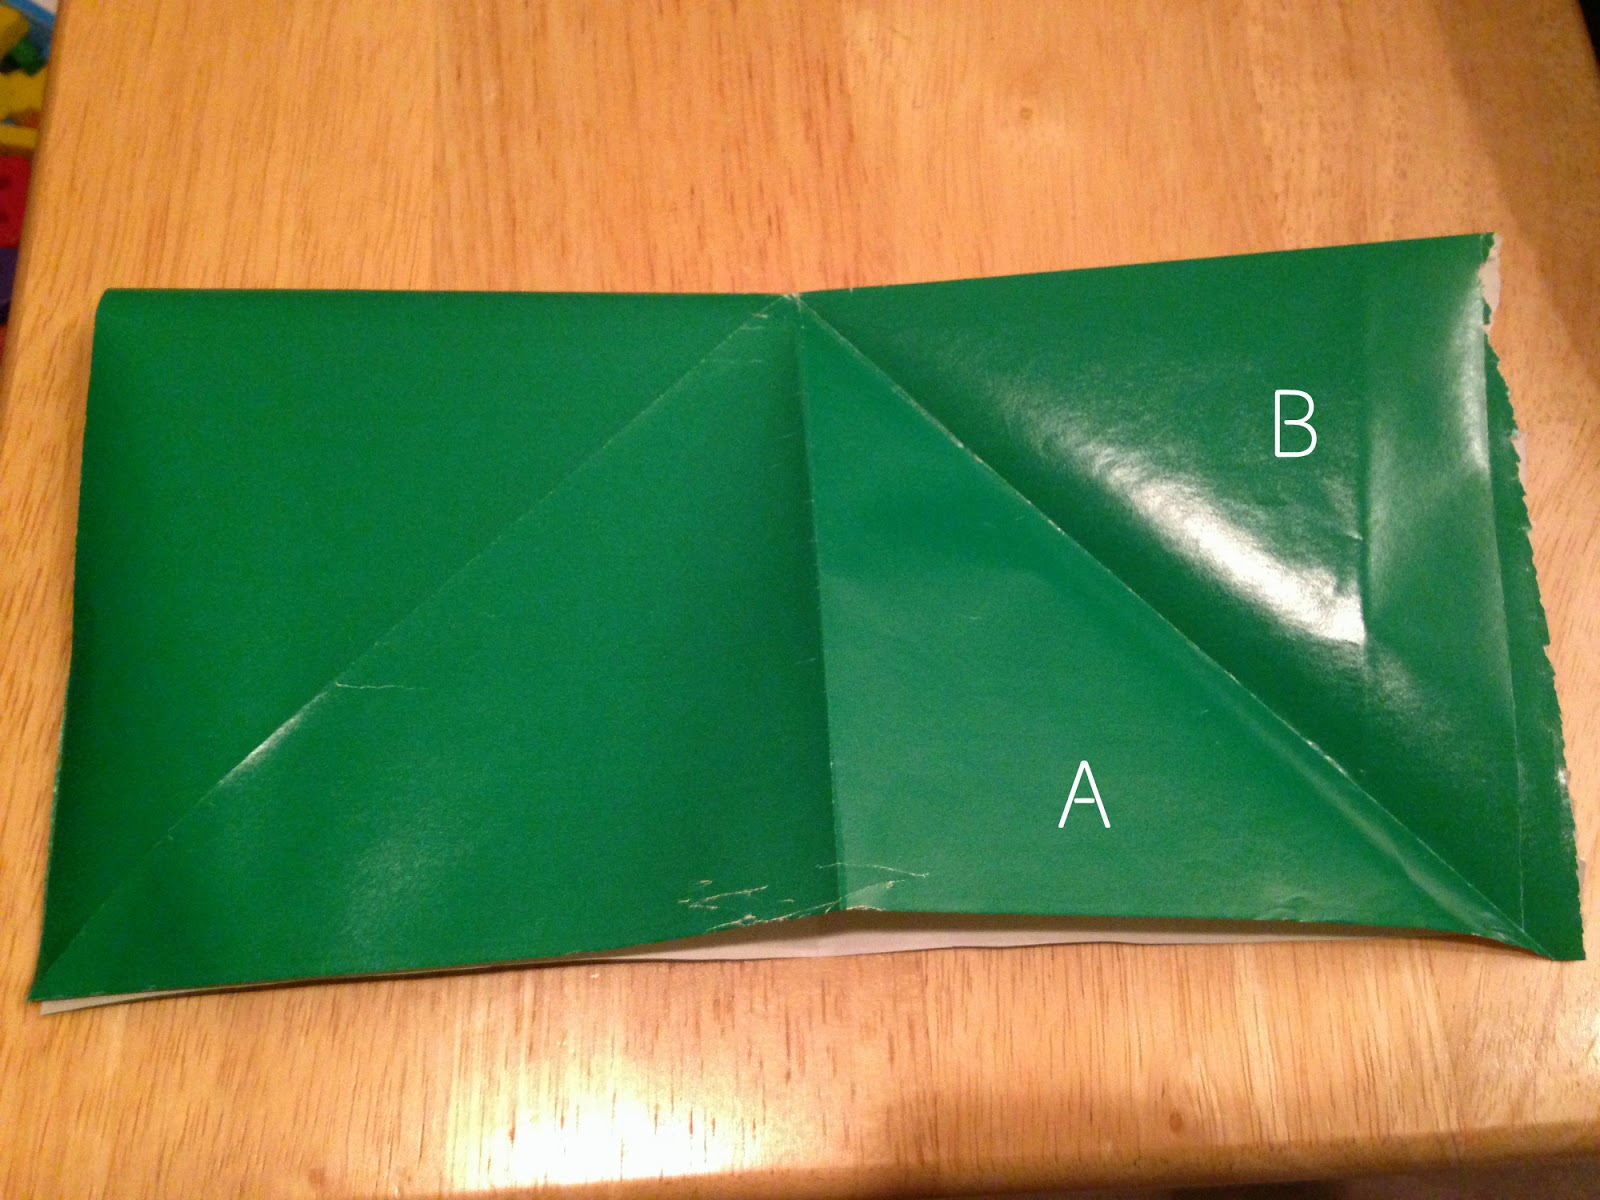
6. Fold the paper in half again. Fold A up to B while holding the bottom piece down and crease so it looks like the picture below. (Jump to 1:20 on the video)
7. Lift D and C fold in C so it looks like the picture below. (Jump to 1:25 on the video to see how it is done)
8. Turn the paper so the open side is closest to you.
9. Fold the corners so it meets the line in the middle.
11. Unfold one side and tuck the corner in so it resembles a diamond shape. Repeat for the other three sides. (Jump to 2:35 on the video)
12. Trim the bottom of the diamond with scissors so it forms an (isosceles) triangle. Note: adults, please supervise younger children when using scissors.
13. Make 5 or 6 equal cuts on each side, cutting through all the layers. Make sure the cut is not too close to the center line.
14. Fold the sides in so it resembles a tree.
15. Fluff out so the sections are evenly spaced. Decorate your Christmas dinner table!
Source: Krokokat via Pinterest
10.02.2014
In Memory of My Late Grandmother
I still cannot believe it has been 7 years since my maternal grandmother passed away suddenly. She was 76. I know most people would say that she lived a long and happy life, but with most people now living to their 90s, and some to 100, I wished she could have been here on earth for even a few more years.
Most people who knew my late maternal grandmother will remember her by her generous nature, kind words and big heart. She was a huge believer in hard work and discipline. These were the fundamental rules to my upbringing.
When I moved to Vancouver, she would often make me my favorite foods when I went home to visit. She was also an amazing cook, her dishes were always perfectly cooked and there was always ample enough amount of food to feed three times the number of dinner guests. Her humble nature never accepted compliments easily and her reply was always, "Grandma loves to hear you love her food. If you like it, grandma will make it for you again".
My last conversation with her was on Friday, September 28th as she had called me to chat. We did this often as my grandmother became my direct line to every crisis, big or small. The next day, I had gone shopping and stopped by a friend's party and missed numerous calls from my brother. I did not find out until Sunday that my grandmother was rushed to the hospital. I went home straightaway to see her but she was already in a semi coma.
We were initially told she would make a partial recovery and need to be in a nursing home. She was scheduled for physiotherapy on October 2nd when her condition took a turn for the worse. The night before, on October 1, right before we left, I teased my grandmother like I always did. I said to her "Grandma, we are leaving now. I love you. If you love me, you better say it too!". Despite being in a semi coma, her last words to us were "I love you too".
On Tuesday, October 2nd, she passed away in the early afternoon around 3:34pm when they unplugged her from the ventilator. This was the most devastating event in my life thus far which I hope never to experience again anytime soon.
With each year, the pain lessens a little but on every anniversary of her death, it feels like the wound reopens again.
I feel her presence quite often every time the sun shines or flowers blossom. Sometimes I dream of her but those dreams do not come as often anymore.
If you love someone, tell them you love them every day and every time you speak to them. Treasure every moment and live graciously and bless others like my grandmother did. Though she may not be alive on earth, she lives in my heart and I will never forget her and I will always love her.
Subscribe to:
Posts (Atom)