To be frankly honest, I am not a fan of canned salmon because the bones and skin in canned salmon grosses me out. Canned salmon reminds me of the soggy and fishy smelling salmon sandwiches I ate as a child.
While shopping at Costco in January, I spotted canned salmon on sale for $1.17 per can. It has been so long since I've had canned salmon that I thought it would be a great idea to buy a Costco sized pack.
Fast forward 3 months later, while looking through my pantry for dinner inspirations, I spotted the cans of salmon sitting on my pantry shelf. Wasn't I planning to make something with them?
Racking through my brain, I had a great idea to use the canned salmon to make salmon burgers. As I was making them, I crossed my fingers that the salmon burgers would taste good; and not taste like it came from a can.
As the salmon burgers were pan-frying in my cast iron skillet, my husband commented that dinner smelled good. I was still a little wary how it would taste and whether my family would like my latest creation.
I watched as my husband took a bite of his salmon burger. After he proclaimed it was delicious, I took a bite and was delighted that salmon burgers tasted nothing like the canned salmon I ate as a child.
This salmon burger pairs especially well with the Dill Mayonnaise. Along with a side of parsnip fries, this meal was the perfect dinner. You'll almost forget these salmon burgers came from the can!
Ingredients
1/2 medium onion, finely diced
2 eggs
1/2 cup seasoned bread crumbs (or coarsely ground seasoned croutons)
5 tbsp Dill Mayonnaise (recipe here)
1/2 tsp freshly cracked black pepper
1/4 tsp freshly ground sea salt
2 (6-1/2 ounce) cans of salmon
2 tbsp vegetable oil
Directions
1. Preheat the oven to 400 degrees F.
2. Drain the canned salmon and pick out all the bones and skin.
3. Combine the canned salmon, onions, eggs, bread crumbs, black pepper, salt, and dill mayonnaise together. Mix well.
4. Divide the mixture into 4 even portions and form into patties. Set aside.
5. In a large cast iron skillet (or oven safe pan), heat 2 tablespoons of vegetable oil over medium heat.
6. Once the skillet is hot, place the salmon burgers into the skillet and cook until it is golden brown. Press the burger down with a spatula. Flip the burger and cook the other side until golden brown.
7. Place the cast iron skillet into the oven and cook for 3 to 4 minutes. Serve over the carb of your choice along with the dill mayonnaise.
Source: Slightly adapted from Food Network
Frugal Mom To a Nut Allergic Child. Recipes, frugal finds, child development and food allergy management. Posts weekly.
Showing posts with label Cast Iron. Show all posts
4.15.2015
4.03.2015
Greek Pizza
At every university I have attended or visited, there is always one pizza parlour that stands out above the rest. At the University of British Columbia, Pie R Squared, (the pizza parlour in the Student Union Building) is amazing. For $2.75, you get a generous slice of pizza that will fill your belly. The selection was always quite good as it offered vegetarian pizzas as well as the tried and true (looking at you Pepperoni pizza!). Usually about an hour after eating my slice of pizza, I'm ready for a nap.
One of my personal favorites is the Greek pizza loaded with feta cheese, tomato, bell peppers, red onions and olives. What I love about the Greek pizza is that I feel like it's a balanced meal: protein, vegetables and carbohydrates all in one neat package.
Today, I decided to try out a new pizza dough recipe. This recipe is not great but not bad either. It is a little chewier than other pizza doughs I have made but I still prefer my other pizza dough recipe over this one. Try both recipes and let me know which one you prefer!
Makes: Two 10 inch pizzas
Ingredients
1-1/2 tsp yeast
1 tsp sugar
1 cup warm water
1 tbsp vegetable oil
2-1/2 cups all purpose flour (plus an extra 1/8 cup of flour as needed)
1/4 tsp salt
1 tsp garlic powder
1 tsp dried oregano
3 - 4 tbsp vegetable oil
Toppings (for 2 pizzas)
2 - 3 tbsp extra virgin olive oil
1 cup feta cheese, crumbled
1 bell pepper, diced
1 large tomato, diced
1/4 red onion, sliced (optional)
1/2 cup Kalamata olives, sliced
Directions
1. Mix yeast and sugar in warm water in the bowl of a stand mixer until it dissolves. Allow the yeast to bloom.
2. In a stand mixer fitted with a dough hook, add in oil, flour, salt, garlic powder and dried oregano. Turn the stand mixer to low and once all the flour has been incorporated, turn the mixer to medium speed and knead for 5 minutes until a dough ball forms. The dough should be slightly tacky but does not stick to your hands.
3. Cover the bowl with a kitchen towel or plastic wrap. Place the bowl in the oven with the oven light turned on and allow the pizza dough to rise for 15 minutes.
4. Dump the dough onto a counter lightly dusted with flour and knead a few times. Divide the dough into 2 balls of equal size. Stretch, toss or roll out the dough to approximately 10 inches.
5. Place a cast iron skillet in the oven and preheat the oven to 375 degrees F.
6. Take the cast iron skillet out of the oven once the oven is preheated. Drizzle with a tablespoon or two of vegetable oil to coat the skillet.
7. Add the pizza dough to the cast iron skillet and drizzle the pizza dough with a tablespoon of extra virgin olive oil. With your hands or a brush, spread the olive oil all over the pizza dough.
8. Sprinkle feta cheese, bell pepper, tomato, red onion and Kalamata olives on top.
9. Bake for 30 to 35 minutes in the middle rack until the pizza crust is golden brown.
Source: (Dough) slightly adapted from Food; (Toppings) Frugal Allergy Mom
One of my personal favorites is the Greek pizza loaded with feta cheese, tomato, bell peppers, red onions and olives. What I love about the Greek pizza is that I feel like it's a balanced meal: protein, vegetables and carbohydrates all in one neat package.
Today, I decided to try out a new pizza dough recipe. This recipe is not great but not bad either. It is a little chewier than other pizza doughs I have made but I still prefer my other pizza dough recipe over this one. Try both recipes and let me know which one you prefer!
Makes: Two 10 inch pizzas
Ingredients
1-1/2 tsp yeast
1 tsp sugar
1 cup warm water
1 tbsp vegetable oil
2-1/2 cups all purpose flour (plus an extra 1/8 cup of flour as needed)
1/4 tsp salt
1 tsp garlic powder
1 tsp dried oregano
3 - 4 tbsp vegetable oil
Toppings (for 2 pizzas)
2 - 3 tbsp extra virgin olive oil
1 cup feta cheese, crumbled
1 bell pepper, diced
1 large tomato, diced
1/4 red onion, sliced (optional)
1/2 cup Kalamata olives, sliced
Directions
1. Mix yeast and sugar in warm water in the bowl of a stand mixer until it dissolves. Allow the yeast to bloom.
2. In a stand mixer fitted with a dough hook, add in oil, flour, salt, garlic powder and dried oregano. Turn the stand mixer to low and once all the flour has been incorporated, turn the mixer to medium speed and knead for 5 minutes until a dough ball forms. The dough should be slightly tacky but does not stick to your hands.
3. Cover the bowl with a kitchen towel or plastic wrap. Place the bowl in the oven with the oven light turned on and allow the pizza dough to rise for 15 minutes.
4. Dump the dough onto a counter lightly dusted with flour and knead a few times. Divide the dough into 2 balls of equal size. Stretch, toss or roll out the dough to approximately 10 inches.
5. Place a cast iron skillet in the oven and preheat the oven to 375 degrees F.
6. Take the cast iron skillet out of the oven once the oven is preheated. Drizzle with a tablespoon or two of vegetable oil to coat the skillet.
7. Add the pizza dough to the cast iron skillet and drizzle the pizza dough with a tablespoon of extra virgin olive oil. With your hands or a brush, spread the olive oil all over the pizza dough.
8. Sprinkle feta cheese, bell pepper, tomato, red onion and Kalamata olives on top.
9. Bake for 30 to 35 minutes in the middle rack until the pizza crust is golden brown.
Source: (Dough) slightly adapted from Food; (Toppings) Frugal Allergy Mom
3.21.2015
30 Minute Hawaiian Pizza
When I first moved out on my own, I used to order pizza from pizza parlours. It would take anywhere from 30 to 45 minutes for pizza delivery on weeknights. On Fridays and Saturdays, it can take upwards of an hour and half for pizza.
After waiting 90 painful minutes for pizza once, I swore that would be the last time I paid $20 for a large pizza and had to wait 90 minutes. It was then that I started buying frozen pizza.
Frozen pizza costs 1/5 of the price of ordering pizza from a pizza parlour and ready in 25 minutes. The only thing was that the crust does not taste very good, but for $4, I can't really complain.
Ever since I discovered how to make pizza at home (the perks of having a peanut and almond allergic child), eating frozen pizza just doesn't cut it for me anymore. One, I have no idea if it would be safe for my little man to eat. Two, after you make fresh pizza at home and see how easy it is, you will never want to go back to either frozen pizza or order pizza again.
This recipe takes only 30 minutes from start to finish and costs a fraction of the frozen pizzas. I would highly recommend making a double batch and freezing an extra pizza or two for later.
Makes: Two 10 inch pizzas
Ingredients
3 cups all-purpose flour
1-1/2 tsp (0.25 ounce) active dry yeast
1 tbsp white sugar
1 tsp salt
2 tbsp vegetable oil
1 cup warm water (approximately 110 degrees F)
1 tbsp Italian seasoning
2 tbsp vegetable oil, separated
1/2 cup pizza sauce (I used spaghetti sauce)
2 cups diced cooked ham
1-1/2 cups pineapple pieces
2 cups shredded mozzarella cheese
Directions
1. Combine flour, yeast, sugar and salt in a stand mixer.
2. With a dough hook, mix in oil and warm water until the dough is smooth and pulls away from the bowl.
3. Place a cast iron skillet (or baking stone) in the oven and preheat to 375 degrees F.
4. Turn dough out onto a lightly floured surface.
5. Divide dough in half. Pat into a round disk. Using your rolling pin, roll the dough out into a round or stretch the dough out by hand to approximately 10 inches.
6. Using an oven mitt, take the cast iron skillet out of the oven. Add one tablespoon of oil to coat the cast iron skillet.
7. Transfer the pizza crust to the cast iron skillet. Spread 1/4 cup of the pizza sauce evenly all over the pizza crust. Top with 1 cup of ham, 3/4 cup of pineapple and 1 cup of mozzarella cheese. Repeat with remaining dough and toppings.
8. Bake for 20 to 25 minutes or until the cheese is bubbling. Allow the pizza to cool for a few minutes before eating.
Source: Slightly adapted from Allrecipes
After waiting 90 painful minutes for pizza once, I swore that would be the last time I paid $20 for a large pizza and had to wait 90 minutes. It was then that I started buying frozen pizza.
Frozen pizza costs 1/5 of the price of ordering pizza from a pizza parlour and ready in 25 minutes. The only thing was that the crust does not taste very good, but for $4, I can't really complain.
Ever since I discovered how to make pizza at home (the perks of having a peanut and almond allergic child), eating frozen pizza just doesn't cut it for me anymore. One, I have no idea if it would be safe for my little man to eat. Two, after you make fresh pizza at home and see how easy it is, you will never want to go back to either frozen pizza or order pizza again.
This recipe takes only 30 minutes from start to finish and costs a fraction of the frozen pizzas. I would highly recommend making a double batch and freezing an extra pizza or two for later.
Makes: Two 10 inch pizzas
Ingredients
3 cups all-purpose flour
1-1/2 tsp (0.25 ounce) active dry yeast
1 tbsp white sugar
1 tsp salt
2 tbsp vegetable oil
1 cup warm water (approximately 110 degrees F)
1 tbsp Italian seasoning
2 tbsp vegetable oil, separated
1/2 cup pizza sauce (I used spaghetti sauce)
2 cups diced cooked ham
1-1/2 cups pineapple pieces
2 cups shredded mozzarella cheese
Directions
1. Combine flour, yeast, sugar and salt in a stand mixer.
2. With a dough hook, mix in oil and warm water until the dough is smooth and pulls away from the bowl.
3. Place a cast iron skillet (or baking stone) in the oven and preheat to 375 degrees F.
4. Turn dough out onto a lightly floured surface.
5. Divide dough in half. Pat into a round disk. Using your rolling pin, roll the dough out into a round or stretch the dough out by hand to approximately 10 inches.
6. Using an oven mitt, take the cast iron skillet out of the oven. Add one tablespoon of oil to coat the cast iron skillet.
7. Transfer the pizza crust to the cast iron skillet. Spread 1/4 cup of the pizza sauce evenly all over the pizza crust. Top with 1 cup of ham, 3/4 cup of pineapple and 1 cup of mozzarella cheese. Repeat with remaining dough and toppings.
8. Bake for 20 to 25 minutes or until the cheese is bubbling. Allow the pizza to cool for a few minutes before eating.
Source: Slightly adapted from Allrecipes
3.11.2015
Chinese Eggplant with Garlic Sauce
While shopping at my local Chinese supermarket a couple weeks back, I saw Chinese eggplants on sale. These eggplants were vibrant purple, plump and had a smooth skin without any blemishes. In all my years of grocery shopping, it is rare you come across fresh eggplants like these on sale, so I had to pick up a few to bring home.
I wanted to try to recreate the eggplant dish that I always order at Chinese restaurants: with ample amount of garlic, soft and tender eggplants that maintain their vibrant purple hue. The best stir-fried eggplant I have had is from the food stalls in Yaohan Centre in Richmond, but it has been well over a year since I have eaten there.
I searched online and came across a recipe that looked good. I made two changes to the original recipe: omitting the chili peppers as it would be too spicy for the little man, and omitting the black vinegar. This recipe tastes delicious but the eggplants lost its color during the cooking process and turned a dark brownish purple, despite my attempt to blanch them quickly in hot water.
Afterwards, I did a little research and found out the reason why my eggplants turned brown. One thread on Chowhund said that to prevent the skin of the eggplant from oxidizing (turning brown), you need to either weigh the eggplants down with a plate when blanching or deep fry the eggplants in 3 inches of hot oil. Next time I see eggplants on sale again, I will have to try this tip out!
If you decide to make this recipe, please let me know if you try the Chowhund tip above and how (and if) it worked for you.
Ingredients
4 tbsp vegetable oil, divided
3 large Chinese or Japanese eggplants, cut into 2 inch long strips
5 cloves garlic, finely minced
1 tbsp ginger, finely minced
2 stalks green onion, chopped
1 tbsp soy sauce
1/2 tsp sugar
Directions
1. In a pot of boiling water, blanch the eggplants for 15 seconds. (To maintain the eggplant's purple color, the tip from Chowhund said to weigh the eggplants down with a plate or deep fry the eggplants in 3 inches of hot oil). Drain the eggplants and immerse them in cold water to stop the cooking process.
2. Add 2 tablespoons of oil to a wok or cast iron pan over high heat. Once the oil is shimmering and the pan is hot, add the eggplants in a single layer and cook for a minute.
3. Flip the eggplant to cook the other side for another minute or two. Remove from the pan.
4. Pour in the remaining 2 tablespoons of oil to the pan. Stir fry the garlic, ginger and green onion until fragrant.
5. Mix the eggplants, garlic, ginger and green onion together. Add in soy sauce, sugar and stir to combine. Serve immediately.
Source: Slightly adapted from Steamy Kitchen
I wanted to try to recreate the eggplant dish that I always order at Chinese restaurants: with ample amount of garlic, soft and tender eggplants that maintain their vibrant purple hue. The best stir-fried eggplant I have had is from the food stalls in Yaohan Centre in Richmond, but it has been well over a year since I have eaten there.
I searched online and came across a recipe that looked good. I made two changes to the original recipe: omitting the chili peppers as it would be too spicy for the little man, and omitting the black vinegar. This recipe tastes delicious but the eggplants lost its color during the cooking process and turned a dark brownish purple, despite my attempt to blanch them quickly in hot water.
Afterwards, I did a little research and found out the reason why my eggplants turned brown. One thread on Chowhund said that to prevent the skin of the eggplant from oxidizing (turning brown), you need to either weigh the eggplants down with a plate when blanching or deep fry the eggplants in 3 inches of hot oil. Next time I see eggplants on sale again, I will have to try this tip out!
If you decide to make this recipe, please let me know if you try the Chowhund tip above and how (and if) it worked for you.
Ingredients
4 tbsp vegetable oil, divided
3 large Chinese or Japanese eggplants, cut into 2 inch long strips
5 cloves garlic, finely minced
1 tbsp ginger, finely minced
2 stalks green onion, chopped
1 tbsp soy sauce
1/2 tsp sugar
Directions
1. In a pot of boiling water, blanch the eggplants for 15 seconds. (To maintain the eggplant's purple color, the tip from Chowhund said to weigh the eggplants down with a plate or deep fry the eggplants in 3 inches of hot oil). Drain the eggplants and immerse them in cold water to stop the cooking process.
2. Add 2 tablespoons of oil to a wok or cast iron pan over high heat. Once the oil is shimmering and the pan is hot, add the eggplants in a single layer and cook for a minute.
3. Flip the eggplant to cook the other side for another minute or two. Remove from the pan.
4. Pour in the remaining 2 tablespoons of oil to the pan. Stir fry the garlic, ginger and green onion until fragrant.
5. Mix the eggplants, garlic, ginger and green onion together. Add in soy sauce, sugar and stir to combine. Serve immediately.
Source: Slightly adapted from Steamy Kitchen
2.21.2015
5 Minute Cast Iron Grilled Steak
I love my cast iron skillet. It is the best investment I have spent on a pan. Unlike my nonstick, which I have to replace every year, my cast iron skillet will be with me for a long time. The versatility of cast iron is amazing, as it can go easily from stovetop to oven. If you have a cast iron skillet or are curious what type of recipes cast iron skillets can make, check out my cast iron recipes here.
For Valentine's Day, I purchased a jumbo pack of strip loin steaks which was on sale. Each steak weighs about a pound. I looked for a recipe online that allowed me to use my favorite skillet to cook my steaks and came across this Alton Brown recipe. The beauty of this recipe is that the steak takes only 5 minutes to cook; great for any night really. Cast iron for the win again!
Ingredients
Steak (1 inch thick)
Oil
Salt and pepper, to taste
Directions
1. Take the steaks out of the refrigerator 20 minutes before cooking to allow the meat come to room temperature. This allows the steak to cook evenly.
2. Place the cast iron skillet in the oven and preheat to 500 degrees F.
3. Lightly oil the steaks and season with salt and pepper on both sides.
4. Once the oven temperature reaches 500 degrees, take the cast iron skillet out of the oven.
5. Turn the stove to high and heat the cast iron skillet for 3 minutes or until it just starts smoking. Do not add any oil to the skillet.
6. Place steaks on the cast iron skillet and sear for 30 seconds.
7. Flip and sear the other side for another 30 seconds.
8. Once both sides have been seared, place the steak in the oven and cook for 2 minutes.
9. Take the steak out of the oven, flip and cook for another 2 minutes in the oven.
10. Remove steak from the cast iron skillet and allow it to rest on a plate loosely covered with tinfoil for 5 minutes before serving. Are you hungry yet?
Source: Food Network
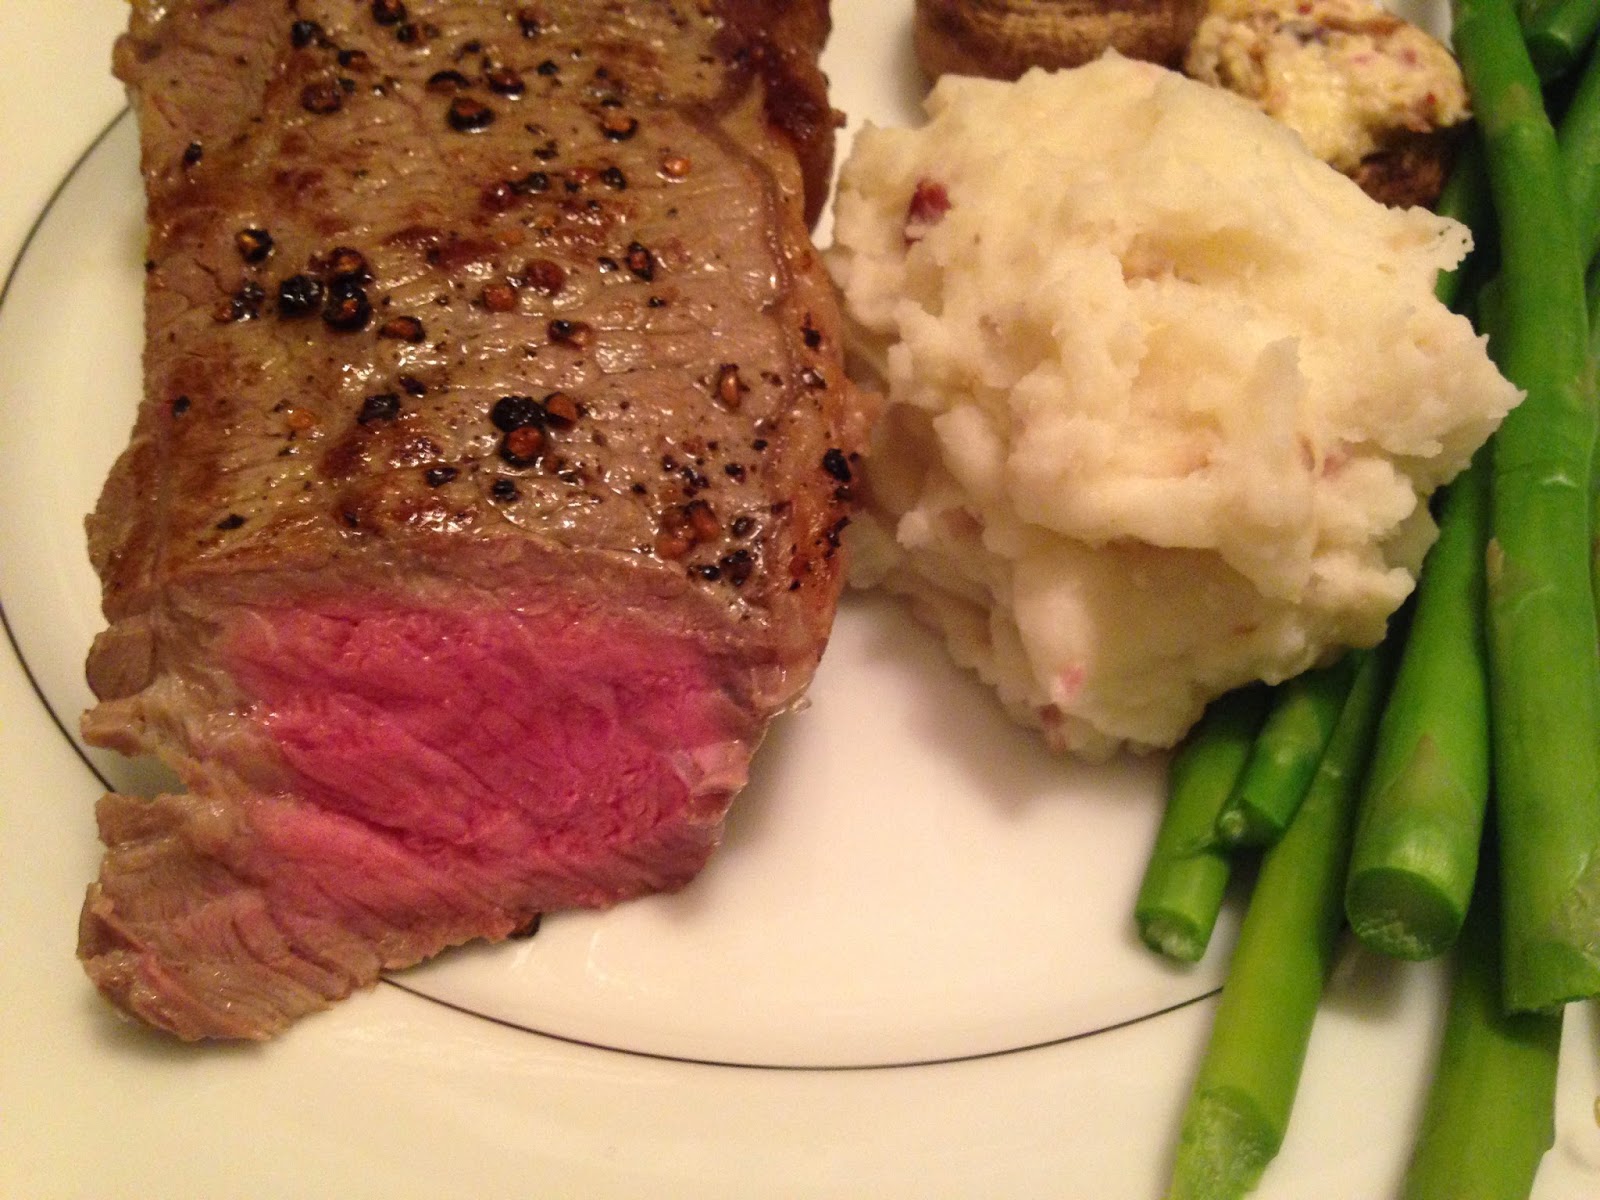
For Valentine's Day, I purchased a jumbo pack of strip loin steaks which was on sale. Each steak weighs about a pound. I looked for a recipe online that allowed me to use my favorite skillet to cook my steaks and came across this Alton Brown recipe. The beauty of this recipe is that the steak takes only 5 minutes to cook; great for any night really. Cast iron for the win again!
Ingredients
Steak (1 inch thick)
Oil
Salt and pepper, to taste
Directions
1. Take the steaks out of the refrigerator 20 minutes before cooking to allow the meat come to room temperature. This allows the steak to cook evenly.
2. Place the cast iron skillet in the oven and preheat to 500 degrees F.
3. Lightly oil the steaks and season with salt and pepper on both sides.
4. Once the oven temperature reaches 500 degrees, take the cast iron skillet out of the oven.
5. Turn the stove to high and heat the cast iron skillet for 3 minutes or until it just starts smoking. Do not add any oil to the skillet.
6. Place steaks on the cast iron skillet and sear for 30 seconds.
7. Flip and sear the other side for another 30 seconds.
8. Once both sides have been seared, place the steak in the oven and cook for 2 minutes.
9. Take the steak out of the oven, flip and cook for another 2 minutes in the oven.
10. Remove steak from the cast iron skillet and allow it to rest on a plate loosely covered with tinfoil for 5 minutes before serving. Are you hungry yet?
Source: Food Network
1.31.2015
Cast Iron Chicken Chow Mein
I use my cast iron skillet to cook pretty much everything from pizza to dessert. To date, I have yet to cook Chinese food in my cast iron skillet.
Similar to a wok, a cast iron skillet retains heat well and can be used to quickly stir fry foods at high temperatures. Using a cast iron to cook chow mein is an ideal compromise for those who do not own a wok or those who do not have a wok compatible stove, like a ceramic glass top (like us!).
I have been using my non-stick skillet when I make chow mein. As I cook more and more at home, I have found that I prefer using my cast iron over my non-stick. Cast iron offers many benefits as food cooks faster, meats stay moist and you can cook at a higher temperature (just to name a few things).
I have been wanting to cook Chinese food in my cast iron skillet for a while. So last night, I decided to cook chicken chow mein in my cast iron skillet. My husband watched all of this with a wary eye and asked if this method has been tested out before. To be honest, I never bothered to Google it but I'm sure I'm not reinventing the wheel here. ;)
The chicken and the green beans both stir fried quickly in the cast iron (no surprise). The chow mein noodles also did not stick to the skillet as my cast iron is well seasoned. The end result is delicious chow mein that is ready in half the time. My husband and I both noticed that the chicken is moist and the vegetables are cooked to perfection. I can't wait to try more Chinese recipes in my cast iron skillet!
Ingredients
2 boneless skinless chicken breasts or thighs, sliced into thin strips
1 tsp cornstarch
1 tbsp soy sauce
1 tbsp vegetable oil
8 cups julienned vegetables (I used julienned green beans*)
2 tbsp water
2 tbsp vegetable oil
454 g chow mein noodles
2 tbsp soy sauce
1 tbsp sesame oil
* I removed the stem from the green beans and cut it diagonally into smaller pieces
Directions
1. Heat a cast iron skillet over medium-high heat. Add vegetable oil.
2. In a bowl, mix sliced chicken breast strips, cornstarch and soy sauce.
3. Once the skillet is hot, add the chicken breast strips and stir fry until it is almost cooked.
4. Add the julienned vegetables to the skillet and cook until the vegetables are tender. Stirring frequently, add water to deglaze the skillet. Set aside.
5. In a separate pot, boil water and prepare chow mein noodles according to package directions. Drain and set aside.
6. Pour 2 tablespoons of vegetable oil in the skillet. Once the skillet is hot, add the chow mein noodles, toss frequently with tongs for a minute or two.
7. Add in the chicken, julienned vegetables, soy sauce, sesame oil and toss thoroughly. Serve hot.
Source: Frugal Allergy Mom
Similar to a wok, a cast iron skillet retains heat well and can be used to quickly stir fry foods at high temperatures. Using a cast iron to cook chow mein is an ideal compromise for those who do not own a wok or those who do not have a wok compatible stove, like a ceramic glass top (like us!).
I have been using my non-stick skillet when I make chow mein. As I cook more and more at home, I have found that I prefer using my cast iron over my non-stick. Cast iron offers many benefits as food cooks faster, meats stay moist and you can cook at a higher temperature (just to name a few things).
I have been wanting to cook Chinese food in my cast iron skillet for a while. So last night, I decided to cook chicken chow mein in my cast iron skillet. My husband watched all of this with a wary eye and asked if this method has been tested out before. To be honest, I never bothered to Google it but I'm sure I'm not reinventing the wheel here. ;)
The chicken and the green beans both stir fried quickly in the cast iron (no surprise). The chow mein noodles also did not stick to the skillet as my cast iron is well seasoned. The end result is delicious chow mein that is ready in half the time. My husband and I both noticed that the chicken is moist and the vegetables are cooked to perfection. I can't wait to try more Chinese recipes in my cast iron skillet!
Ingredients
2 boneless skinless chicken breasts or thighs, sliced into thin strips
1 tsp cornstarch
1 tbsp soy sauce
1 tbsp vegetable oil
8 cups julienned vegetables (I used julienned green beans*)
2 tbsp water
2 tbsp vegetable oil
454 g chow mein noodles
2 tbsp soy sauce
1 tbsp sesame oil
* I removed the stem from the green beans and cut it diagonally into smaller pieces
Directions
1. Heat a cast iron skillet over medium-high heat. Add vegetable oil.
2. In a bowl, mix sliced chicken breast strips, cornstarch and soy sauce.
3. Once the skillet is hot, add the chicken breast strips and stir fry until it is almost cooked.
4. Add the julienned vegetables to the skillet and cook until the vegetables are tender. Stirring frequently, add water to deglaze the skillet. Set aside.
5. In a separate pot, boil water and prepare chow mein noodles according to package directions. Drain and set aside.
6. Pour 2 tablespoons of vegetable oil in the skillet. Once the skillet is hot, add the chow mein noodles, toss frequently with tongs for a minute or two.
7. Add in the chicken, julienned vegetables, soy sauce, sesame oil and toss thoroughly. Serve hot.
Source: Frugal Allergy Mom
1.16.2015
Pulled Pork Cast Iron Quesadilla
My husband LOVES quesadillas. He loves ordering it at restaurants and making it when we are home. It is one of those things that is so simple to make that I never order it at restaurants. Why pay $8 for a quesadilla that I can make at home for less than $1? But as a good wife, I hold my tongue. I'm sure he can say the same thing about my Starbucks addiction.
I made quesadillas for lunch with the leftover pulled pork I had in the fridge. It certainly made my husband and little man happy. I served these quesadillas with a side of sour cream (or Greek yogurt if you are eating healthy). The little man was insistent that he gets "more" quesadilla. The apple sure doesn't fall far from the tree.
Ingredients
4 10" flour tortillas
1 cup pulled pork
1 cup shredded mozzarella cheese
1 cup caramelized onions
4 tbsp vegetable oil
Sour cream or Greek yogurt (optional)
Salsa (optional)
Guacamole (optional)
Directions
1. Heat a cast iron skillet over medium high heat.
2. Once it cast iron is hot, turn the heat down to low and add in a tablespoon of vegetable oil.
3. Place flour tortilla in the cast iron skillet.
4. Layer half of the tortilla with 1/4 cup of pulled pork, mozzarella and caramelized onions making sure it is evenly distributed.
5. Fold the tortilla in half and cook until the cheese is melted (about 30 seconds to 1 minute).
6. Flip the tortilla and cook the other side for 30 seconds to 1 minute. Remove.
7. With a pizza cutter or knife, cut the quesadilla into wedges. Serve with sour cream or Greek yogurt. Repeat with the remaining tortillas.
Source: Frugal Allergy Mom
I made quesadillas for lunch with the leftover pulled pork I had in the fridge. It certainly made my husband and little man happy. I served these quesadillas with a side of sour cream (or Greek yogurt if you are eating healthy). The little man was insistent that he gets "more" quesadilla. The apple sure doesn't fall far from the tree.
Ingredients
4 10" flour tortillas
1 cup pulled pork
1 cup shredded mozzarella cheese
1 cup caramelized onions
4 tbsp vegetable oil
Sour cream or Greek yogurt (optional)
Salsa (optional)
Guacamole (optional)
Directions
1. Heat a cast iron skillet over medium high heat.
2. Once it cast iron is hot, turn the heat down to low and add in a tablespoon of vegetable oil.
3. Place flour tortilla in the cast iron skillet.
4. Layer half of the tortilla with 1/4 cup of pulled pork, mozzarella and caramelized onions making sure it is evenly distributed.
5. Fold the tortilla in half and cook until the cheese is melted (about 30 seconds to 1 minute).
6. Flip the tortilla and cook the other side for 30 seconds to 1 minute. Remove.
7. With a pizza cutter or knife, cut the quesadilla into wedges. Serve with sour cream or Greek yogurt. Repeat with the remaining tortillas.
Source: Frugal Allergy Mom
1.11.2015
35 Minute Pulled Pork Pizza
We love the 35 minute pizza recipe. So much so that it is a regular at our house. I love it because it takes 35 minutes to make this pizza including making the dough from scratch. With this recipe, dinner will be ready faster than ordering delivery.
I had made a big batch of pulled pork the day before. One of my favorite things to do with leftover pulled pork is make pizza, which is a crowd pleaser! As my pizza dough was rising, I made caramelized onions in 15 minutes (recipe here).
To save even more time, you can use shredded cheese and leftovers (pulled pork, shredded chicken, ground beef, etc).
Bon appetit!
Makes: 2 - 10 inch pizza (TIP: Make a double batch to freeze for homemade frozen pizza)
Ingredients
2-1/4 tsp active dry yeast (1 package)
1 tsp white sugar
1 cup warm water (110 degrees F)
2 cups all purpose flour
1/2 cup whole wheat flour
2 tbsp olive oil
1 tsp salt
2 tbsp olive oil (to grease the cast iron skillet)
Toppings
1 cup pulled pork
1 cup mozzarella cheese
1/2 cup caramelized onions
Jalapeno peppers (optional - we left it out since we have a little one)
Directions
1. Place a cast iron skillet in the oven and preheat to 450 degrees F. If using a pizza pan, see details below.
2. In a stand mixer, dissolve yeast and sugar in water. Allow yeast to proof for 10 minutes until creamy.
3. Using a paddle attachment, whisk in oil and salt.
4. Switch to a dough hook and stir in the flour until smooth. Allow dough to rest for about 5 minutes.
5. Turn dough out onto a lightly floured surface. Pat into a round disk. Using your rolling pin, roll the dough out into a round or stretch the dough out by hand to a size slightly larger than your skillet.
6.
Using an oven mitt, take the cast iron skillet out of the oven. Add two
tablespoons of oil to coat the bottom of the cast iron skillet.
7. Transfer the pizza crust to the cast iron skillet. Sprinkle the pulled pork evenly across the pizza crust. Top with caramelized onions and mozzarella cheese. Bake the pizza for 15 to 20 minutes or until the cheese is bubbling.
8. Allow pizza to cool for a few minutes before eating.
Pizza Pan Method
Make Ahead and Freeze
If you like this recipe, try my other pizza recipes:
Source: Dough: Slightly adapted from Allrecipes; Toppings: Frugal Allergy Mom
I had made a big batch of pulled pork the day before. One of my favorite things to do with leftover pulled pork is make pizza, which is a crowd pleaser! As my pizza dough was rising, I made caramelized onions in 15 minutes (recipe here).
To save even more time, you can use shredded cheese and leftovers (pulled pork, shredded chicken, ground beef, etc).
Bon appetit!
Makes: 2 - 10 inch pizza (TIP: Make a double batch to freeze for homemade frozen pizza)
Ingredients
2-1/4 tsp active dry yeast (1 package)
1 tsp white sugar
1 cup warm water (110 degrees F)
2 cups all purpose flour
1/2 cup whole wheat flour
2 tbsp olive oil
1 tsp salt
2 tbsp olive oil (to grease the cast iron skillet)
Toppings
1 cup pulled pork
1 cup mozzarella cheese
1/2 cup caramelized onions
Jalapeno peppers (optional - we left it out since we have a little one)
Directions
1. Place a cast iron skillet in the oven and preheat to 450 degrees F. If using a pizza pan, see details below.
2. In a stand mixer, dissolve yeast and sugar in water. Allow yeast to proof for 10 minutes until creamy.
3. Using a paddle attachment, whisk in oil and salt.
4. Switch to a dough hook and stir in the flour until smooth. Allow dough to rest for about 5 minutes.
5. Turn dough out onto a lightly floured surface. Pat into a round disk. Using your rolling pin, roll the dough out into a round or stretch the dough out by hand to a size slightly larger than your skillet.
7. Transfer the pizza crust to the cast iron skillet. Sprinkle the pulled pork evenly across the pizza crust. Top with caramelized onions and mozzarella cheese. Bake the pizza for 15 to 20 minutes or until the cheese is bubbling.
8. Allow pizza to cool for a few minutes before eating.
- Grease pizza pan with oil or dust with cornmeal. Do not put the pizza pan into the oven. Transfer the pizza crust to the pizza pan, add desired toppings and bake as per directions (step 7) above.
Make Ahead and Freeze
- Check out my post here on how to freeze pizzas.
If you like this recipe, try my other pizza recipes:
![]() |
| 35 minute BBQ chicken pizza |
![]() |
| 10 minute pulled pork tortilla pizza |
![]() |
| Margherita pizza |
Source: Dough: Slightly adapted from Allrecipes; Toppings: Frugal Allergy Mom
Subscribe to:
Posts (Atom)


