Showing posts with label Seafood. Show all posts

12.19.2015

Chinese Pork and Shrimp Wontons

My mom and my late grandmother both love wontons. As a child, we had wontons on a regular basis at home during the winter months. As a kid, I can't say I really loved wontons since I usually burnt my tongue trying to eat the little suckers; I am impatient when it comes to food.

I remember watching my mom and my late grandmother spend half a day making a big batch of wontons, most of which were frozen for future meals or for busy nights when dinners needed to be on the table quickly.

I never realized how easy it is to make wontons if you used packaged wrappers. Be forewarned though, making wontons does takes a little effort and time. The batch I made turned out 54 wontons and took me about an hour and half to make from start to finish. I made enough wontons for two meals that fed my family of three. You can also stretch the wontons by adding egg noodles to each serving, which reduces the amount of wontons you have to serve.

I have to say these wontons are absolutely delicious. The shrimp adds a nice texture to the wontons and my husband declared it the best wontons he has ever had. I'm delighted by his comment since my Mother-In-Law makes pretty darned good wontons. Since I spent my life eating wontons, I consider myself a wonton connoisseur, this wontons even met my high expectations. This is definitely a recipe I would remake over and over. I think these wontons would have made my late grandmother proud.


Ingredients
1 lb lean ground pork
1/2 lb finely minced deveined unshelled shrimp
3 green onions, finely chopped
1 inch ginger, peeled and finely grated
2 tbsp light soy sauce
1 egg
1-1/2 tsp sesame oil

1 package of wonton wrappers (look for wonton wrappers that are a little thicker)

Bowl of water
Cutting board
Baking sheet lined with parchment paper

Directions
1. In a large bowl, mix the pork, shrimp, green onions, ginger, soy sauce, egg and sesame oil. Stir until it is thoroughly mixed and the mixture resembles a paste.


2. Line a baking sheet with wax or parchment paper. Set up your wonton wrapping station: cutting board, and a bowl filled with cold water.

Top left clockwise: baking sheet with parchment paper, pork and shrimp filling, wonton wrapper, water, cutting board.

3. With a small teaspoon, spoon a teaspoon of the filling into the center of the wonton. Seal the wonton with water. There are two ways I like to fold my wontons:

Method 1:
Place a teaspoon of filling in the middle of the wonton wrappers. With the tip of your finger, dip it into the bowl of water and paint two adjoining edges with water so it forms a "V".
Fold the wonton in half into a triangle, making sure to squeeze out any air bubbles, press firmly and seal. Create an indent in the middle of the triangle.
Dab a little bit of water on one corner of the wonton, fold and seal. Place the wonton on the parchment paper.
Repeat with the remaining wontons. Wipe up any water from your cutting board with a paper towel.

Method 2:
Place a teaspoon of filling in the middle of the wonton wrapper. With your finger tip, brush half of the edges with water so it forms a "U".
Fold the wonton in half into a rectangle, making sure to squeeze out any air bubbles, press firmly and seal. Create an indent in the middle of the rectangle where the filling is.
Dab a bottom corner with a little bit of water, fold and seal. Place the wonton on the parchment paper.

Repeat with the remaining wontons. Wipe up any water from your cutting board with a paper towel.

4. Place wontons on the baking sheet, making sure to leave a little space between each wonton. Repeat with the wrapping the remaining wontons.

To serve:

Ingredients
Chicken, pork, seafood or vegetable broth
Sesame oil
Wontons
Broccoli, bok choy or other green leafy vegetables
1 package of egg noodles (optional, see note below)
Green onions for garnish (optional)
Hot sauce (optional)

1. In a large pot, bring the broth to a boil. Add wontons to the pot, and reduce heat to medium. Cook the wontons for 3 to 4 minutes before adding in green vegetables (broccoli, shanghai bok choy) or chopped green onions. Add a teaspoon of sesame oil to the broth and cook until the broth comes back to a boil, the vegetables are crisp tender and the wontons float. Ladle some soup and wontons into each bowl. I find that each adult needs about 9 to 11 wontons for a substantial meal and 6 to 8 wontons for a light meal.

If you want to serve egg noodles with the wontons, cook the noodles in a separate pot according to package directions. Drain and divide noodles between each bowl. Ladle soup and wontons into each bowl. If you are serving egg noodles along with wontons, you can serve less wontons for each person. I usually serve 5 wontons per adult if I am also serving egg noodles.

To Freeze:
Freeze wontons in a single layer on a cookie sheet for at least 3 to 4 hours. Once the wontons have frozen completely, you can place them in a Ziploc bag or freezer safe container. The wontons can be frozen in a freezer for up to 2 months. To cook the wontons straight from the freezer: place the frozen wontons directly into boiling broth and allow it to cook 2 to 3 minutes longer.


Source: Slightly adapted from China Sichuan Food

12.12.2015

Greek Pasta Salad with Shrimp, Feta and Roasted Veggies

The first time I made this salad, it was in the middle of August, the hottest time of the year here in Vancouver. I have no idea what prompted me to make this salad and deciding to roast the vegetables in my oven instead of turning on the BBQ.

As my house heated up, roasting veggies in my oven seemed like a really bad idea. I was sweltering from the heat, questioning my sanity. All was good once I took a bite of this pasta salad; then it all seemed worth it.

If you want to make this pasta salad in the summer, I would HIGHLY recommend grilling your vegetables and the shrimp on the BBQ grill. Or even better, grill extra vegetables and shrimp for dinner and use the leftovers in this pasta salad the next day.

I have made this recipe a few times since, and used my oven to roast the vegetables once the weather cooled off. It makes a nice, light, but satisfying meal that doesn't weigh you down. The roasted vegetables really shine through with the simple Dijon vinaigrette. You can substitute chicken in lieu of shrimp but I have to say that shrimp and roasted vegetables are a winning combo!

This pasta salad tastes delicious served either warm or cold. I find that it tastes best if it is allowed to sit for an hour or so for the pasta to absorb the flavors of the vinaigrette. Make sure to keep this salad chilled in the refrigerator.

Ingredients
2 medium zucchinis, sliced into 1/8" rounds, or half moons
1 lb cherry tomatoes, sliced in half
1 large yellow or orange bell pepper, cut into bite sized pieces (optional)
3 tbsp olive oil
Pinch of salt and pepper

1 lb wheat or gluten-free pasta (rotini, penne, or rotelle pastas all work well)
1 lb shrimp, unshelled and deveined
1 tbsp olive oil
1/2 cup kalamata olives, pitted and sliced in half
1 cup crumbled feta cheese
1/2 small red onion, finely diced

Dijon Vinaigrette
1/4 cup rice wine vinegar
2 tbsp Dijon mustard
2/3 cup extra virgin olive oil
1 large clove of garlic, finely minced
2 tbsp dried oregano
Salt and pepper to taste


Directions
1. Toss zucchini, cherry tomatoes, bell peppers in olive oil, salt and pepper. Broil in the oven on medium for 20 minutes or until the vegetables are soft and slightly charred. (An even better idea is to grill your vegetables on the BBQ, especially in the Summer!)


2. Cook the pasta according to package directions until it is al dente. Drain and rinse under cold water. Set aside.

3. Pan fry the shrimp in a tablespoon of olive oil until the shrimp is pink and cooked through. Set aside. (You can also skewer the shrimp and grill it on the BBQ.)


4. Mix the ingredients for the vinaigrette: rice wine vinegar, Dijon mustard, olive oil, garlic, oregano, salt and pepper.


5. Toss the roasted veggies, pasta, shrimp, kalamata olives, feta cheese, and red onion with the Dijon vinaigrette. Serve warm or cold.


Source: Slightly Adapted from Allrecipes

4.15.2015

Salmon Burger From a Can

To be frankly honest, I am not a fan of canned salmon because the bones and skin in canned salmon grosses me out. Canned salmon reminds me of the soggy and fishy smelling salmon sandwiches I ate as a child.

While shopping at Costco in January, I spotted canned salmon on sale for $1.17 per can. It has been so long since I've had canned salmon that I thought it would be a great idea to buy a Costco sized pack.

Fast forward 3 months later, while looking through my pantry for dinner inspirations, I spotted the cans of salmon sitting on my pantry shelf. Wasn't I planning to make something with them?

Racking through my brain, I had a great idea to use the canned salmon to make salmon burgers. As I was making them, I crossed my fingers that the salmon burgers would taste good; and not taste like it came from a can.

As the salmon burgers were pan-frying in my cast iron skillet, my husband commented that dinner smelled good. I was still a little wary how it would taste and whether my family would like my latest creation.

I watched as my husband took a bite of his salmon burger. After he proclaimed it was delicious, I took a bite and was delighted that salmon burgers tasted nothing like the canned salmon I ate as a child.

This salmon burger pairs especially well with the Dill Mayonnaise. Along with a side of parsnip fries, this meal was the perfect dinner. You'll almost forget these salmon burgers came from the can!


Ingredients
1/2 medium onion, finely diced
2 eggs
1/2 cup seasoned bread crumbs (or coarsely ground seasoned croutons)
5 tbsp Dill Mayonnaise (recipe here)
1/2 tsp freshly cracked black pepper
1/4 tsp freshly ground sea salt
2 (6-1/2 ounce) cans of salmon
2 tbsp vegetable oil

Directions
1. Preheat the oven to 400 degrees F.

2. Drain the canned salmon and pick out all the bones and skin.

3. Combine the canned salmon, onions, eggs, bread crumbs, black pepper, salt, and dill mayonnaise together. Mix well.


4. Divide the mixture into 4 even portions and form into patties. Set aside.


5. In a large cast iron skillet (or oven safe pan), heat 2 tablespoons of vegetable oil over medium heat.

6. Once the skillet is hot, place the salmon burgers into the skillet and cook until it is golden brown. Press the burger down with a spatula. Flip the burger and cook the other side until golden brown.


7. Place the cast iron skillet into the oven and cook for 3 to 4 minutes. Serve over the carb of your choice along with the dill mayonnaise.


Source: Slightly adapted from Food Network

2.27.2015

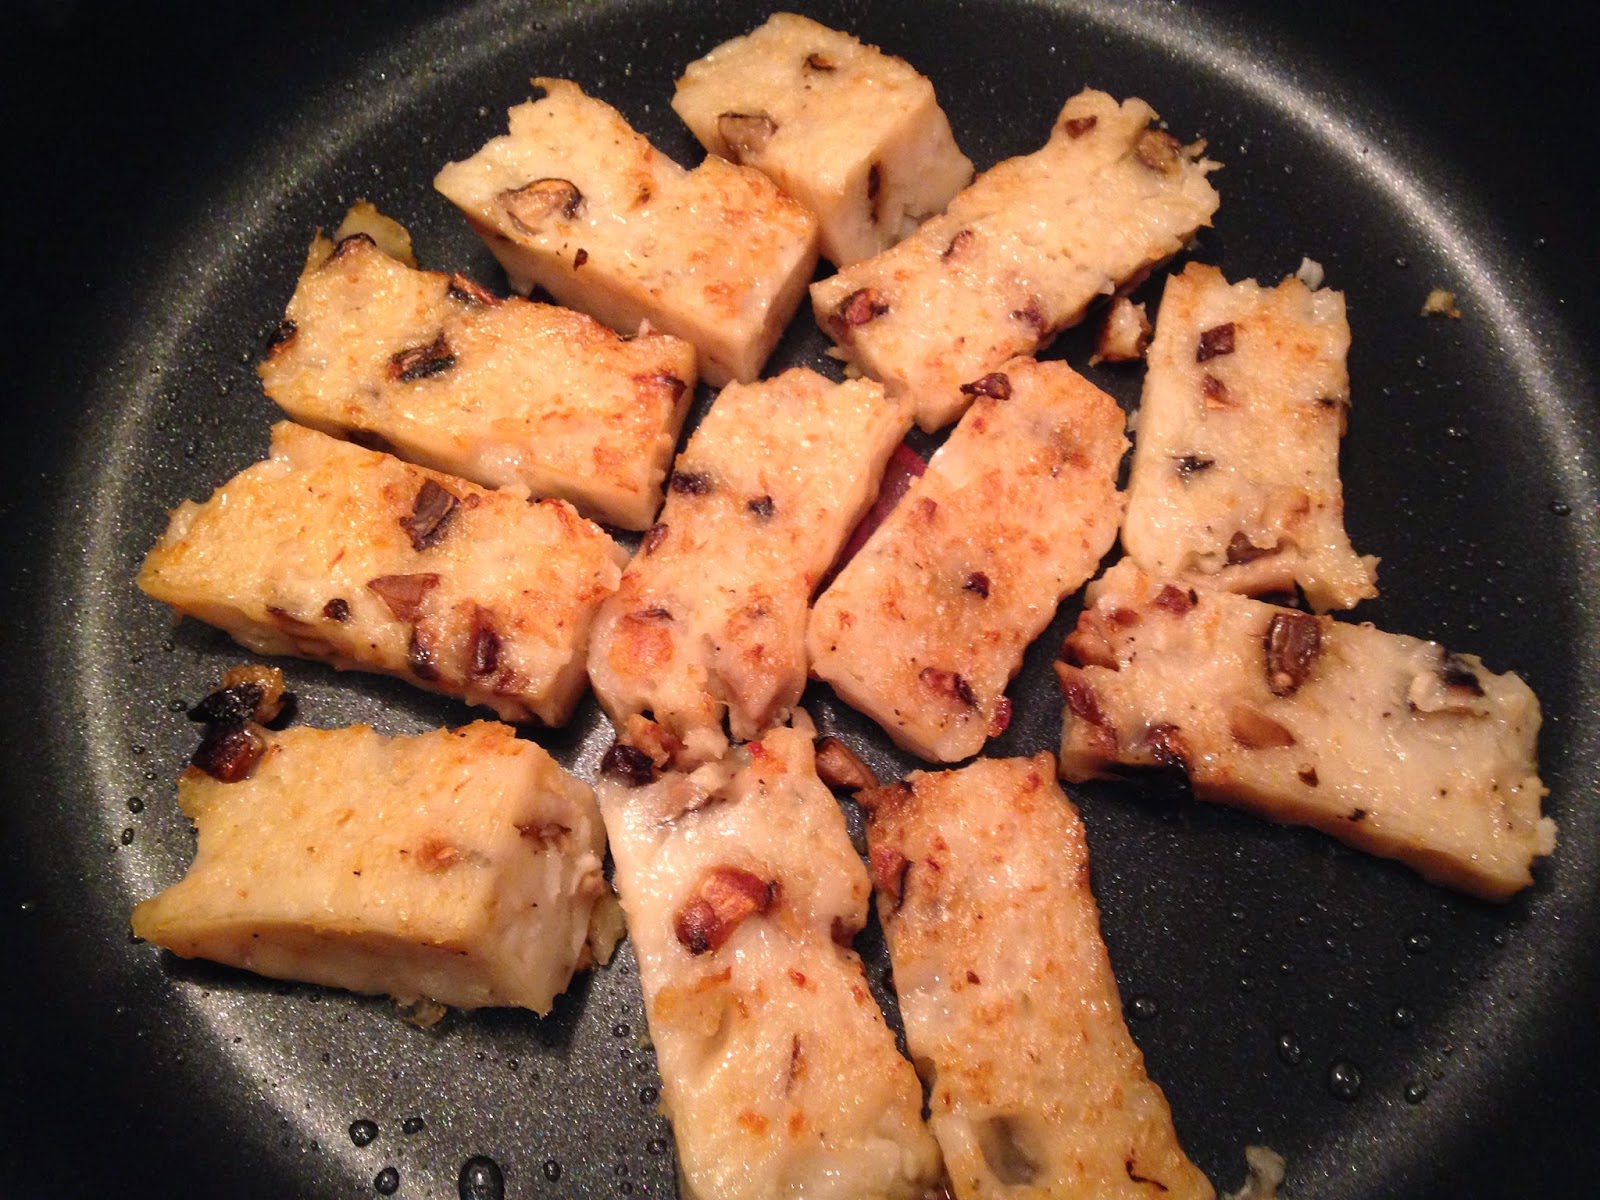
Chinese Turnip Cake (Lo Bak Gaw/Luo Bo Gao)

One of my favorite dishes at dim sum is Chinese Turnip Cake. It is also commonly referred as Lo Bak Gou or Luo Bo Gao. For Chinese New Year, families will often eat Turnip Cake to have good fortune for the upcoming year.

I have always purchased store bought Chinese Turnip Cake for Chinese New Year and pan fried it at home. This is the first year I made Turnip Cake from scratch.

My mother in law has made Lo Bak Gaw many times so I sought her expertise. Based on her description of the process, it did not appear to be hard, but it sounded like it did required a bit of prep work.

With her encouragement and a quick Internet search, I found a recipe that is relatively easy to execute if you follow the steps closely. Since I did not have an 8 inch cake or souffle pan, I used my 6 inch cake pan instead and made two Turnip Cakes.

Making your own Turnip Cake requires more work, but it tastes much better than any store bought version.


Ingredients
1 large Chinese white turnip (about 2 pounds)
8 large Chinese dried shitake mushrooms
1/2 cup Chinese dried shrimp
2 tbsp vegetable oil
2 tsp Chinese rice cooking wine (like Shaoxing Cooking Wine)
1 tsp sugar
1 tsp salt
2 cups rice flour (commonly found at Asian markets)


Directions
1. Peel the turnip and grate (or cut into thin matchsticks) so it makes up 4-1/2 cups.

2. In a large pot, combine the grated turnip and 1 quart (or just under 1 litre) of cold water, bring to a boil over high heat. Reduce heat to low, cover, and simmer for 30 minutes or until the turnip is tender. Drain, reserve 1 cup of the cooking liquid.


3. In bowl, soak the shitake mushrooms with enough hot water to cover. Cover the bowl with a plate and let the mushrooms soak for at least 30 minutes or until the mushrooms are soft.


4. In another bowl, soak the dried shrimp in 1/2 cup cold water for 30 minutes or until it is softened.


5. Set the mushrooms aside and filter the mushroom soaking liquid through a sieve lined with a coffee filter or cheesecloth.  Reserve 1/2 cup of the mushroom liquid. Wash mushrooms under running water and squeeze dry. Dice the mushrooms. Set aside.


6. Drain the dried shrimp and reserve 1/2 cup of the soaking liquid. Finely chop the dried shrimp and set aside.

7. In a wok or skillet over medium heat, add the vegetable oil.


8. Add in diced mushrooms, shrimp and stir fry for 2 to 3 minutes until the mushroom is soft and the shrimp is fragrant.


9. Pour in the rice cooking wine, sugar and stir to combine.

10. Add the cooked drained turnip to the skillet. Stir to combine.


11. In a large bowl, mix the rice flour, 1/2 cup of each of the reserved mushroom soaking liquid and shrimp soaking liquid. Stir until the batter is smooth. Then stir in 1 cup of the hot turnip broth.


12. Pour the batter into the skillet, add salt and stir until combined. The batter will have the texture of rice pudding.


13. Line the bottom of an 8 inch cake pan (or souffle dish with straight sides) with a piece of parchment paper.


14. Pour the batter into the cake pan. Smooth the batter with a spatula.


15. Bring water to a boil in a large steamer or a pot large enough to fit the cake pan without touching the sides. Carefully place the pan into the steamer, cover, reduce heat to medium-low and steam for 1 hour or until the cake is just set and is firm to the touch. Make sure there is enough water and replenish with hot water if necessary.


16. Remove the pan from the steamer and allow it to cool for an hour in a sink filled with cold water.


17. Cover with plastic wrap and refrigerate for at least 3 to 4 hours.

18. Run a flat spatula along the edge of the cake to loosen the sides.


19. Invert to unmold. Peel off the wax paper, wrap in plastic wrap and refrigerate until ready to use.


To serve
1. Slice the cake in half and cut crosswise into 1/2 inch thick slices.


2. In a large skillet, heat 2 tbsp of vegetable oil over medium heat until the pan is hot.


3. Place the turnip cake slices into the skillet and cook each side until it is golden brown and crispy. Flip to cook the other side.


4. Serve hot on its own or with oyster sauce and sriracha hot sauce.


Source: Slightly adapted from Epicurious

2.07.2015

Fish Ball Noodle Soup

This recipe should have been titled Leftover Hot Pot Soup because it essentially was all the leftovers from having hot pot the night before.

I love soups in general, but this soup was extra delicious and flavorful. The broth I used for this fish ball noodle soup was the same broth that cooked the seafood and vegetables in the hot pot.

However, if you don't want to wait for hot pot night to make this delicious recipe, you can use chicken or seafood broth instead. There's nothing better than a nice bowl of piping hot soup on a cold rainy day.


Serves: 4

Ingredients
2 cups leftover hot pot seafood/vegetable broth*
1 cup water*
15 to 20 fish balls and/or shrimp balls
2 cups leaf lettuce (bok choy or sui choy/napa cabbage)
1 bunch enoki mushrooms
1 package of tofu puffs
454 g chow mein/wonton noodles

* If you don't have leftover hot pot broth, use 3 cups of chicken, seafood or vegetable broth instead.

Note: This soup is flexible and you can use as much or as little of each ingredient listed above. You can also substitute in other ingredients as well.


Directions
1. In a large pot, bring broth to a boil.


2. Add in fish balls, shrimp balls, tofu puffs and leaf lettuce.

3. In another pot, bring water to a boil and cook the chow mein or wonton noodles according to package directions. Drain.

3. Once the fish balls, shrimp balls and tofu puffs are cooked through and the leaf lettuce is soft, add in the enoki mushrooms.


4. In each serving bowl, add noodles and top with fish balls, leaf lettuce and enoki mushrooms.

Serve with sriracha hot sauce, if desired.

Source: Frugal Allergy Mom

1.26.2015

Chinese Braised Fish (Hong Shao Yu)

Lately, I have been craving Chinese food. One dish that I have been meaning to make for a long time is a dish called Hong Shao Yu (the literal translation is "Red Braised Fish"). This is another one of my grandmother's famous dishes.

This Chinese braised fish recipe tastes similar to the Filipino dish adobo, which I also adore. The fish is first pan-fried and then simmered in a mildly sweet and savory sauce, which tastes amazing over a bowl of steamed (white) rice.

My only recommendation is to use a thicker white fish fillet (1/2 inch or thicker) as my thin sole fillets fell apart when I tried to pan fry it.

This recipe comes close to my grandmother's version but it does not quite taste the same. Even though my search goes on, I have to admit that this recipe is a keeper and definitely satiated my craving for Chinese food.


Ingredients
2 tbsp vegetable oil
1 lb fish fillet (preferably 1/2 inch or thicker)
1 stalk of green onion, chopped
1 inch piece of ginger, sliced into coins
1 cup water
1/4 cup Chinese cooking wine (or rice wine)
1/4 cup dark soy sauce
3 tbsp brown sugar
1 stalk of green onion, chopped (for garnish)

Cornstarch Slurry
1 tbsp cornstarch
2 tbsp water

Directions
1. Add oil to a pan over medium-high heat.

2. Pat both sides the fish fillet dry with a paper towel.


3. Add the fish to the pan and cook each side until is it golden (about 1 to 2 minutes). Transfer the fish to a plate.


4. To the same pan, add green onions and ginger. Stir fry until fragrant.


5. Add in water, cooking wine, soy sauce and brown sugar. Mix and bring to a boil.


6. Once the sauce reaches a boil, return fish to the pan.


7. Cover, and reduce heat to medium-low and simmer until it is cooked through, about 7 to 10 minutes.

8. Transfer fish to a serving platter.

9. Mix the cornstarch and 3 tablespoons of water in a small measuring cup. Pour the cornstarch slurry into the pan.


10. Increase heat to medium-high to reduce the sauce until it is thickened, about 4 to 6 minutes.


11. Pour sauce over the fish and garnish with green onions. Serve immediately as part of a multi-course meal.


Source: Adapted from Saveur